 |
|||
|
|
|||
|
Page Title:
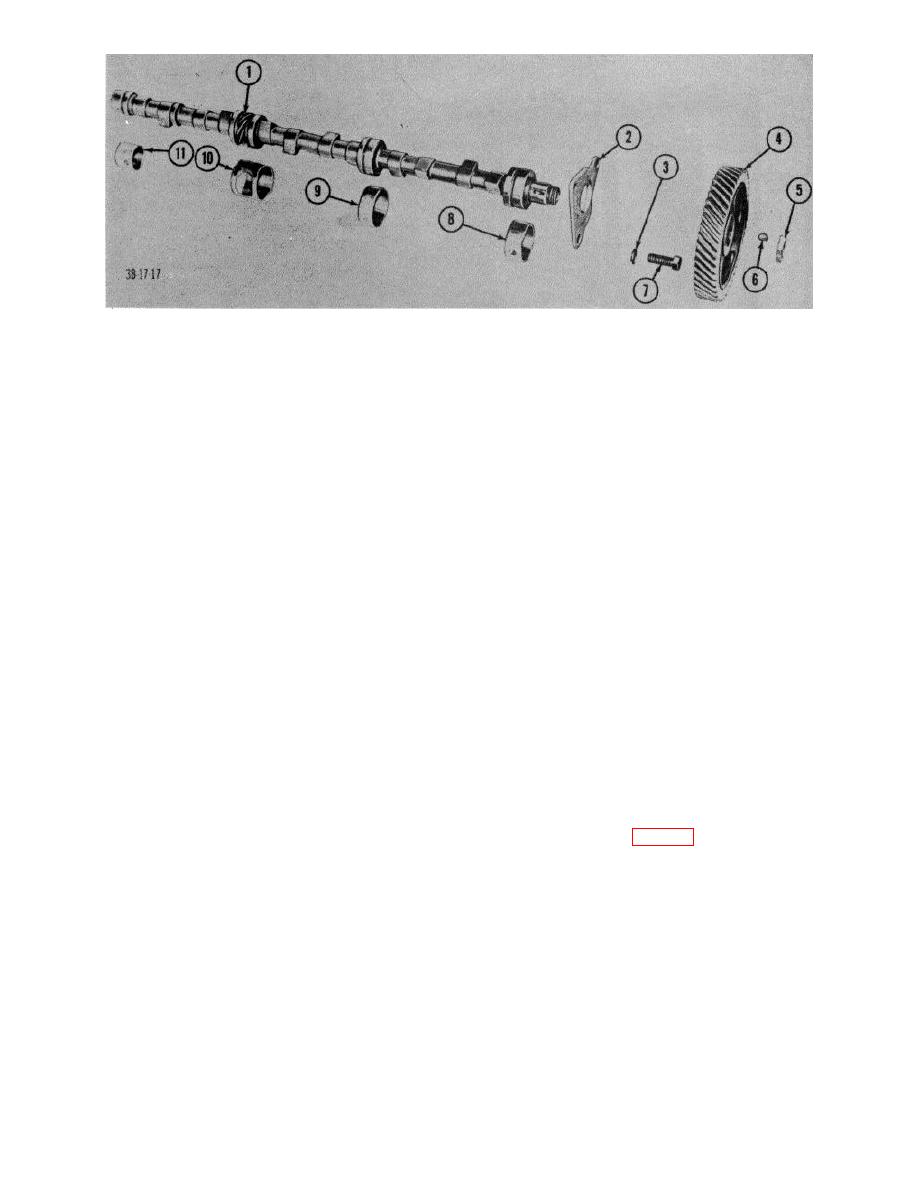
Figure 7. Camshaft, exploded view. |
|
||
| ||||||||||
|
|
 1
Camshaft
7 Bolt, thrust plate
2
Plate thrust
8 Bearing, sleeve, front
3
Lockwasher, thrust plate bolt
9 Bearing, sleeve, intermediate front
4
Gear, timing
10 Bearing, sleeve, intermediate rear
5
Nut, self-locking, gear-to-camshaft
11 Bearing, sleeve, rear
6
Key, woodruff
Figure 7. Camshaft, exploded view.
valves, using above procedure.
Grasp valve on unworn portion of stem, close to head,
If any margin is below
and grind valve as follows:
minimum, discard valve and
(a) Position chuck so that contact is
install a new one.
just barely made between
c. Installation. Reverse procedure in a above.
grinding wheel and valve face
d. Adjustment. Refer to TM 10-3980-20.
Feeding. wheel slowly into
valve, make a very light cut
around entire valve face,
23. Valve Guides
always keeping valve in contact
a. Inspection and Cleaning.
with grinding wheel. If the cut
(1) Remove valve ((1) through (6), par. 22).
removes metal from one-half of
(2) Inspect guide for wear and carbon
valve face or less, inspect
deposits.
If carbon is excessive,
chucking (gripping) of valve. If
clean out with brush and/or proper
inspection reveals valve is
size reamer.
If guide is worn
squarely mounted, valve is
excessively so that valve stem
misalign
and
must
be
clearance
does
not
meet
discarded. If mounting is faulty,
specifications (par. 7), replace guide
check valve squarely and
(b and c below).
repeat operation. When face is
b. Removal.
ground
evenly
on
(1) With valve removed (a above), remove
circumference,
the
valve
valve lifter adjusting screw.
alinement is satisfactory.
(2) Using a suitable drift, knock valve guide
(b)
After first cut has proved
(5, fig. 9) down until lower end
satisfactory,
proceed
with
approaches valve lifter, and remove
grinding operation. Do not take
guide.
heavy cuts or remove more
(3) Repeat procedures in (1) and (2) above
metal than necessary to remove
for the remaining guides
all imperfections.
c. Installation. Mark point on driving mandrel 1
(c)
When valve face has been
15/32 inches from driving end, position new valve guide,
ground, remove valve and
and drive in until top of guide is 1 15/32 inches from top
check margin for minimum
of cylinder block.
thickness of 3/64 inch at any
point. If margin is satisfactory,
place valve in its position in
rack and grind remaining
7010A
13
|
|
Privacy Statement - Press Release - Copyright Information. - Contact Us |