 |
|||
|
|
|||
|
|
|||
| ||||||||||
|
|
 TM 10-393-242-34
halves are doweled to the bearing cap, the upper
h a l v e s are not doweled.
b. Removal (Crankshaft in Place).
(1) Remove the engine (para 2-5).
( 2 ) Remove the oil pan to expose the main
bearing caps (para 3-24).
( 3 ) Remove the oil pump inlet pipe and
s c r e e n assembly (para 3-25),
( 4 ) Remove all except the rear main bear-
ing, dress down the head of a 1/4" x 3/4" bolt to a
thickness of 1/16". (The thickness of the dressed
down bolt head, must be less than the thickness
o f the bearing shell). Insert the bolt into the
crankshaft journal oil hole and revolve the
c r a n k s h a f t so that the bolt head contacts the
b e a r i n g shell opposite the bearing locating tang
and roll the bearing out of the block.
NOTE
Remove one main bearing cap at a time, inspect as
outlined under INSPECTION in this section, and
complete replacement of shell and reinstallation of
cap before another cap is removed.
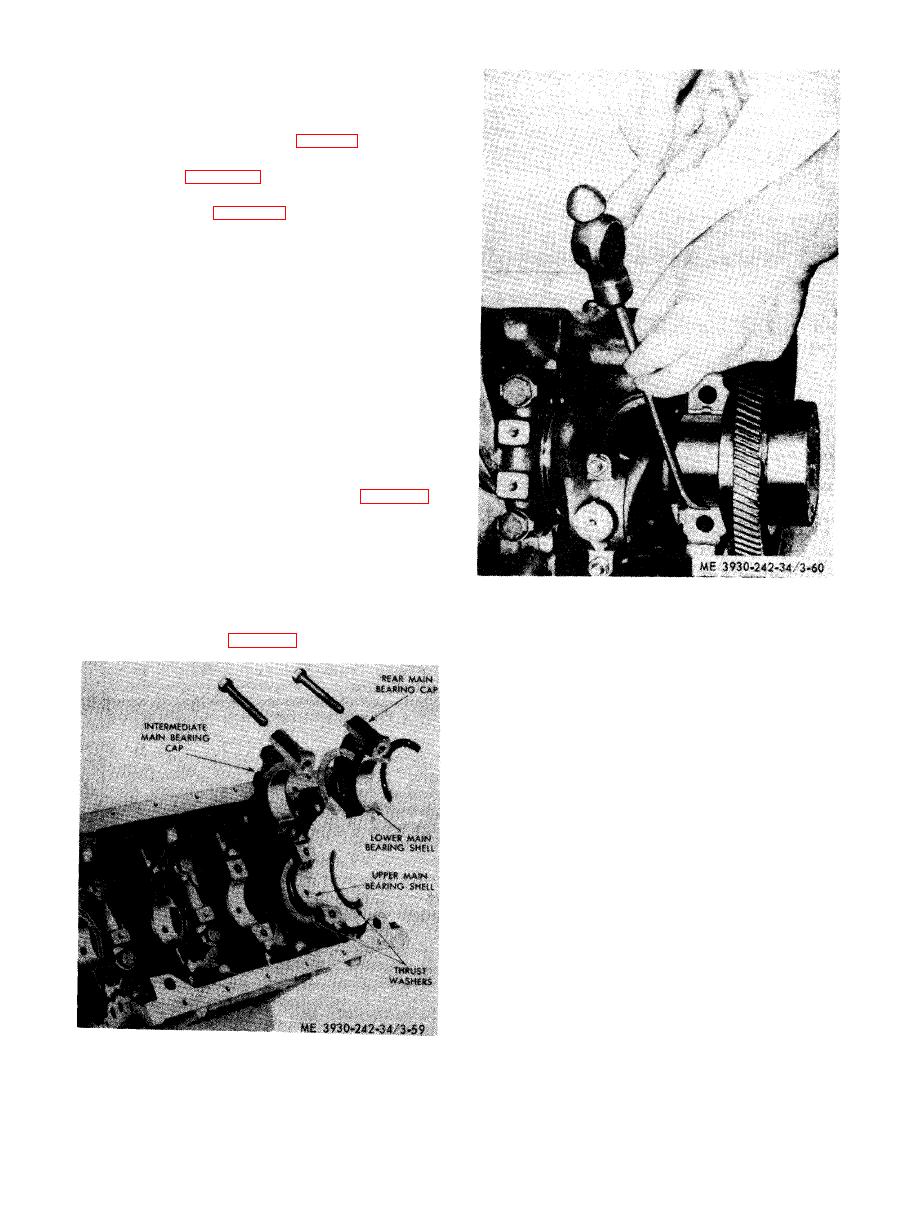
(5) Two-piece thrust washers are used on
e a c h side of the rear main bearing (fig. 359).
The lower half of these washers will be removed
when removing the rear main bearing cap;
upper half can be removed by pushing on end of
w a s h e r with a small rod, thus forcing washer
around and out on opposite side of bearing.
(6) Remove rear main bearing upper shell
(crankshaft in place).
by driving on the edge of the bearing shell with
a small curved rod (fig. 3-60) at the same time
revolving the crankshaft, thus rolling the shell
from its position.
c. Cleaning and Inspection.
(1) After removal, clean the bearing shells,
thoroughly, with P-D-680, or equal, and dry. In-
s p e c t them for scoring, pitting, flaking, chip-
ping, cracking, loss of babbitt, or signs of over-
heating. If any of these defects are present, the
b e a r i n g s must be discarded. However, the bab-
b i t t plated bearings may develop minute cracks
or small isolated cavities on the bearing surface
d u r i n g engine operation. These are characteris-
t i c s of and are not detrimental to this type of
bearing. The bearings should not be replaced for
t h e s e minor surface imperfections since func-
t i o n i n g of the bearings is in no way impaired
a n d they will give many additional hours of
trouble-free operation. The lower bearing shells,
w h i c h carry the load, will normally show signs
of distress before the upper shells do.
(2) Inspect the back of the bearing shells for
b r i g h t spots that indicate they have been mov-
ing in the caps or cylinder block. If such spots
caps, and rear main bearing thrust washers.
a r e present, discard the bearing shells.
|
|
Privacy Statement - Press Release - Copyright Information. - Contact Us |
