 |
|||
|
|
|||
|
|
|||
| ||||||||||
|
|
 TM 10-3930-632-34
The filler blocks provide mountings for the seals that
9-15.
Removal
retain the oil at the front and rear of the engine. They are
mounted between the oil pan and cylinder block. The oil
a.
Remove the drain plug from the oil pan to
pump is secured to the engine crankcase and is driven
drain the engine oil.
by a gear that is integral with the camshaft. The oil pump
b.
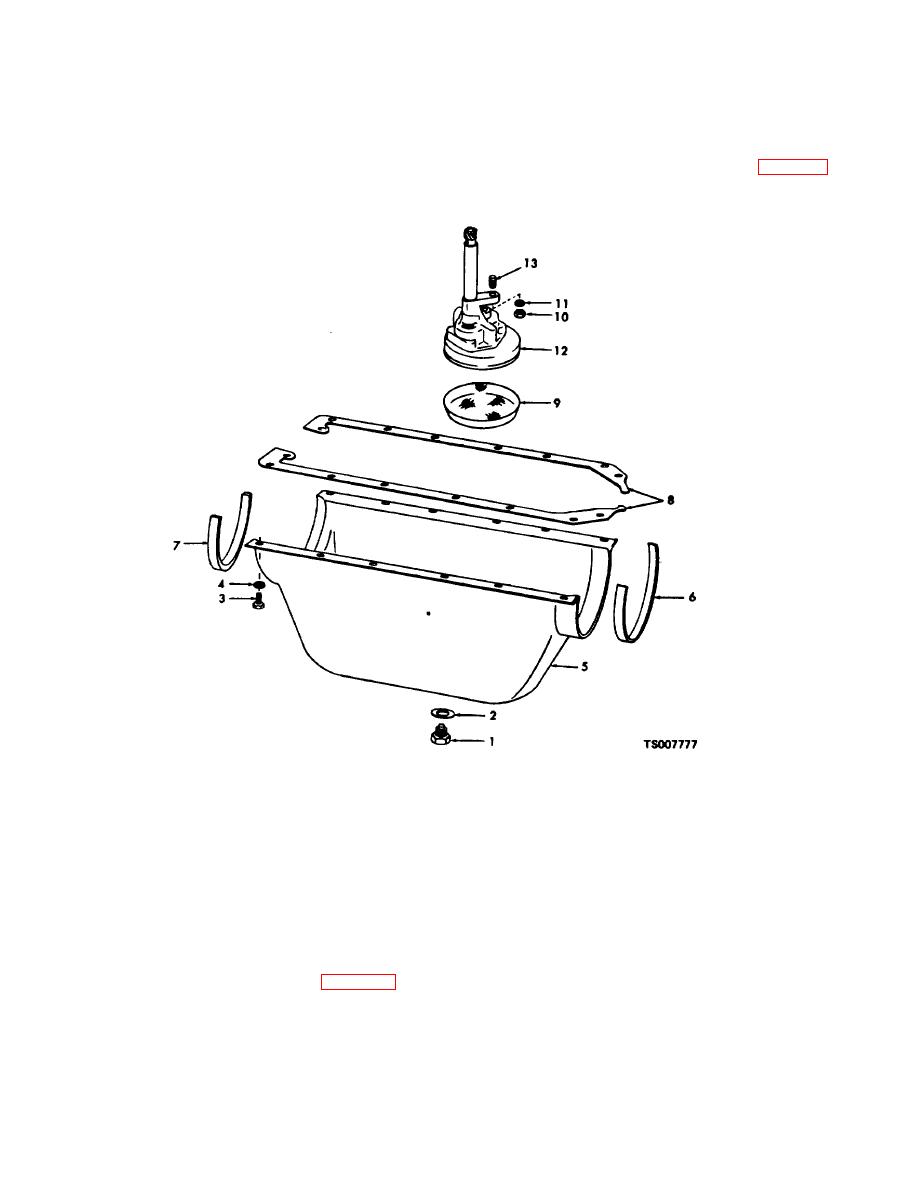
Remove the twelve screws (3, fig. 9-13) and
provides pressure necessary to pump the engine oil to
lockwashers (4) that secure the oil pan (5) to the block;
the operating parts of the engine.
remove the oil pan and gaskets (6, 7 and 8).
1.
Plug
8.
Gasket
2.
Gasket
9.
Screen
3.
Capscrew
10.
Nut
4.
Lockwasher
11.
Lockwasher
5.
Oil pan
12.
Oil pump
6.
Gasket
13.
Stud
7.
Gasket
Figure 9-13. Oil Pan and Oil Pump, Exploded View.
c. Remove the nut (10) and lockwasher (11) that
remove the filler block.
secure the oil pump assembly (12) to the engine; remove
the oil pump assembly. Remove the oil screen (9) from
WARNING
the oil pump assembly.
d. Remove the two screws (29, fig. 9-26) and
Dry cleaning solvent, P-D-680, used to clean
lockwashers (30) that secure the rear filler block (28) to
parts is potentially dangerous to personnel and
the engine block; remove the filler block and seal (26).
property. Avoid repeated and prolonged skin
e. Remove the two screws (32) and lockwashers
contact. Do not use
(33) that secure the front filler block (31) to the block;
9-10.1/(9-10.2 blank)
|
|
Privacy Statement - Press Release - Copyright Information. - Contact Us |