 |
|||
|
|
|||
|
|
|||
| ||||||||||
|
|
 TM 10-3930-630-12
the headlight allows it to be rotated and directed as
(4) Inspect cables for secure connection
necessary to illuminate the work area.
and evidence of corrosion.
(2) Inspection.
(5) Remove caps from battery and check
(a) Turn on light switch and check switch and
level of fluid in battery. Level should be three eighths of
an inch above plates.
c. Service.
(1) Fill battery to proper level if
necessary.
(2) Check filler caps for tight fit and cover
vent holes.
(3) Clean top of battery, posts and cable
terminals with a solution of baking soda and water. Do
not allow solution to enter battery cells.
(4) When foaming stops flush battery and
cables terminals with clean, fresh water. Remove
covers from vent holes in caps.
(5) Replace damaged or frayed cables.
Disconnect cables from battery, starter and ground at
engine. Install new cables and tighten securely. Install
ground cable (negative) last.
(6) Check condition of battery using a
hydrometer.
If specific gravity is 1.225 or lower,
recharge battery. A fully charged battery should read
1.265 to 1.290 specific gravity.
d. Removal
(1) Lift and prop seat in open position.
(2) Disconnect battery cables (fig. 4-28)
from battery.
(3) Remove wing nut (fig. 4-28) and
washer and lift battery holddown up and to the right to
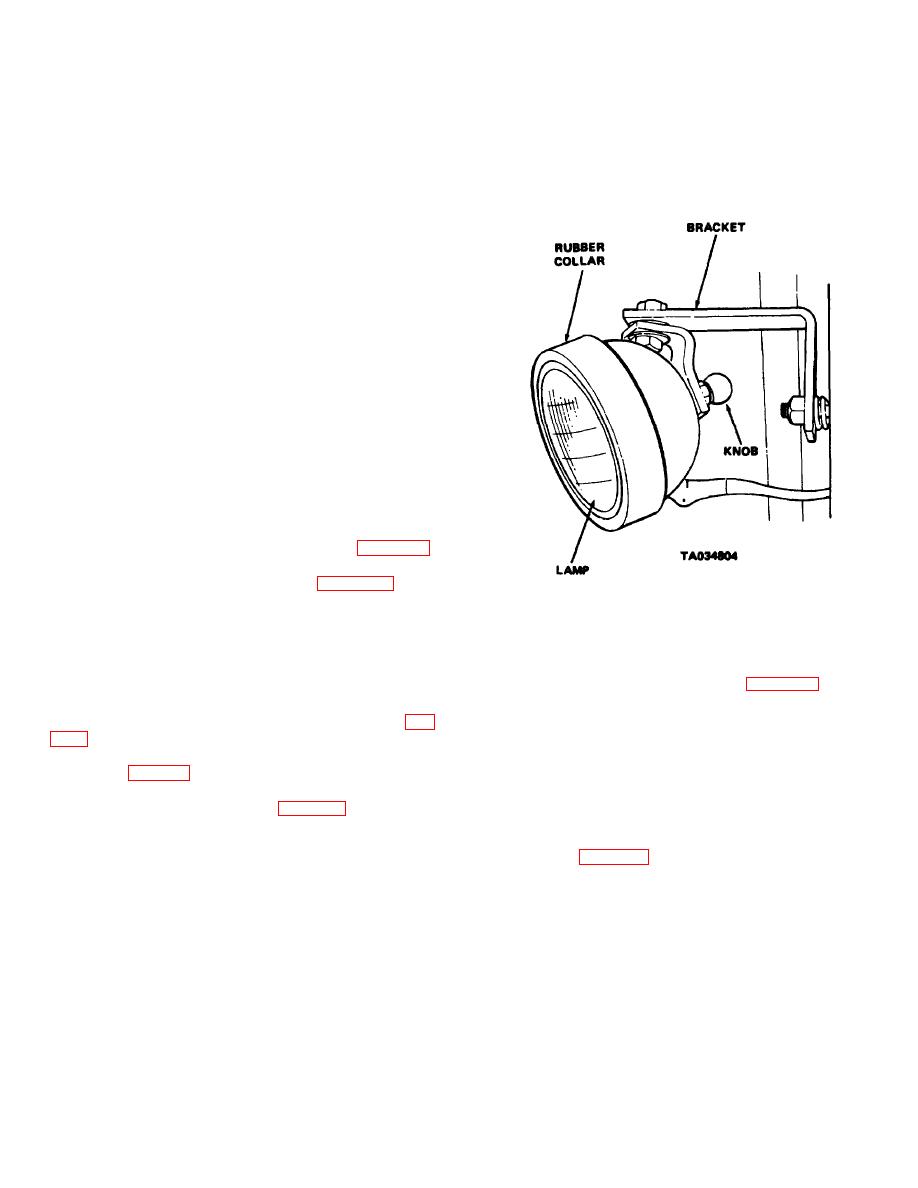
Figure 4-29. Headlight, installed view.
free battery.
(4) Use a suitable battery lifting tool and
(b) To remove headlight, slide boot
lift battery from battery tray.
down wire and disconnect wire from headlight.
(5) Remove screws and remove battery
(c) Unscrew knob (fig. 4-29) from
box and holddown.
rear of headlight. Remove nut and washer from bracket
e. Installation.
and remove headlight.
(1) Install battery box and holddown (fig.
(d) To remove wire from mast,
remove screws and remove clamp. Disconnect wire at
(2) Use a suitable battery lifting tool and
double connector and remove wire.
lift battery (fig. 4-28) into position in battery tray.
(4) Installation.
(3) Place battery holddown into position to
(a) Connect wire to double connector
secure battery. Install wing nut (fig. 4-28) and washer
and secure wire to mast with clamp.
and tighten wing nut securely.
(b) Install headlight with stud at rear
(4) Connect battery cables to battery
of headlight (fig. 4-29) through bracket. Secure light
posts and tighten securely.
Install ground cable
with washer and nut. Install knob.
(negative) last.
(c) Connect wire to headlight and
(5) Remove prop and lower seat and
slide boot into position to protect connection.
support into position.
b. Combination Rear Light. The light mounted
4-47. Lights
at the top of the counterweight is a combination light.
a. Headlight.
When the light switch is on, it is lit to function as a
(1) General.
The truck headlight is
taillight. Depressing the brake pedal actuates a
mounted on the left side of the mast. Operation is
controlled through a push-pull light switch (fig. 21)
mounted on the instrument panel Bracket mounting of
4-39
|
|
Privacy Statement - Press Release - Copyright Information. - Contact Us |
