 |
|||
|
|
|||
|
|
|||
| ||||||||||
|
|
 TM10-3930-628-12
(3) Remove retaining rings and remove lever
4-52. Control Levers and Linkage
shaft from brackets and levers.
a. General. Two control levers, connected to the
(4) Remove levers and spacing washers.
control valve by linkages, actuate the lift and tilt cylinders.
(5) Install new levers, with shaft through
Movement of the levers opens ports in the valve to allow
brackets, levers and spacing washers. Secure shaft with
hydraulic pressure to flow to the cylinders. A switch,
retaining rings.
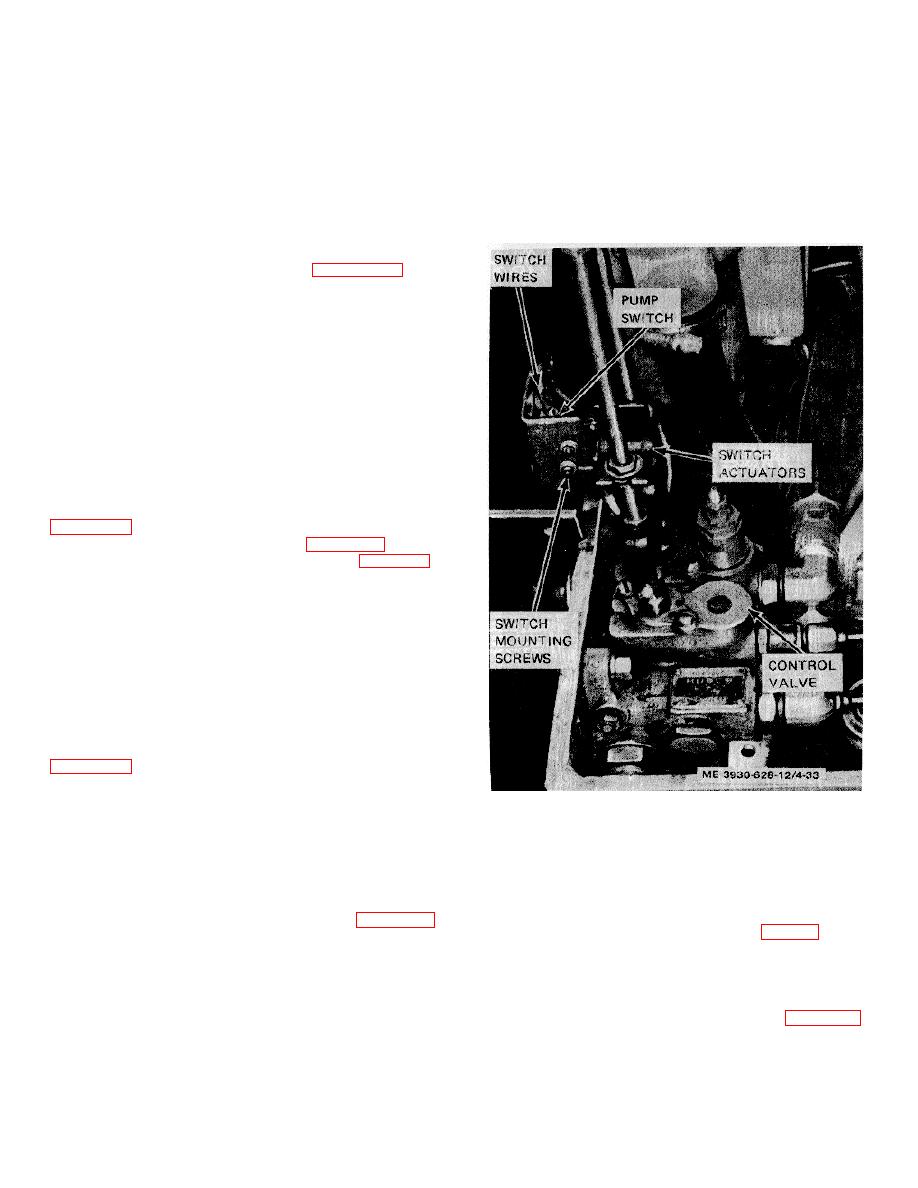
normally open, is mounted on a bracket behind the
(6) Connect yokes to levers with screws and
control rods. When a control lever is moved, the
self-locking nuts.
actuator contacts and closes the switch and starts the
hydraulic pump motor. Remove sheet metal cover to
gain access to linkage.
b. Lever Adjustment. Refer to figure 4-32 and
adjust linkage as follows:
(1) Remove screws and nuts attaching yokes
to control levers or to control valve.
(2) Loosen yoke lock nuts and adjust yokes on
rods to shorten or lengthen linkage.
(3) Linkage-should be adjusted to allow the
least amount of free play. When adjustment is complete,
control valve plungers must be in the neutral position
when levers are released.
c. Switch Adjustment. Switch actuators must be
adjusted to have switch open when plungers are in
neutral position. Adjustment must be such that the
actuators close the switch with little movement of the
control lever. Disconnect battery receptacle. Refer to
(1) Move control levers (fig.
4-32) as if
operating lift and tilt mechanisms. Switch (fig. 4-33)
should close with an audible click after little movement.
(3) Loosen switch mounting screws and move
switch in or out as required. Switch roller should just
touch groove in actuators. Tighten switch mounting
screws.
(4) Move control levers and check adjustment.
(5) Connect battery receptacle and check
operation.
Pump should operate before cylinders
extend.
d. Switch Replacement. If switch requires re-
placement, disconnect battery receptacle and refer to
(1) Disconnect wires from switch. (2) Remove
two mounting screws and remove switch.
Figure 4-33. Hydraulic pump switch, installed view.
(3) Install new switch and secure with
mounting screws.
4-53.
Tilt Cylinder
(4) Connect wires to switch.
(5) Check and adjust switch (c above) to
a. General. Two tilt cylinders, one on each side of
assure proper operation.
the frame, provide power to tilt the mast.
(6) Connect battery receptacle.
b. Removal. Remove the tilt cylinder as follows:
d. Control Lever Replacement. Refer to figure 4-32
(1) Operate the tilt control lever (fig. 2-2) to tilt
and replace control levers as follows:
the mast forward. Connect a chain hoist to the mast to
(1) To replace lever knobs, remove knob from
hold it in a forward position.
lever.
(2) Remove floor and toe plates. Remove drip
(2) To replace lever, remove screw and self-
pan from underside of truck.
locking nut to disconnect lever from yoke.
(3) Disconnect hose assemblies (fig. 4-34)
from elbows in underside of cylinder. Plug hose and
cylinder ports.
(4) Support cylinder with a block of wood.
4-33
|
|
Privacy Statement - Press Release - Copyright Information. - Contact Us |