 |
|||
|
|
|||
|
|
|||
| ||||||||||
|
|
 Note
Before adjusting the valve clearance, run
the engine at approximately 1200 RPM, for
a minimum of 30 minutes in order to
temperatures.
Then
stabilize
engine
proceed as follows:
a. Reduce the engine speed to approx-
imately 650 RPM, then shut engine off.
Apply parking brake.
b. Remove the rocker arm cover hold down nuts.
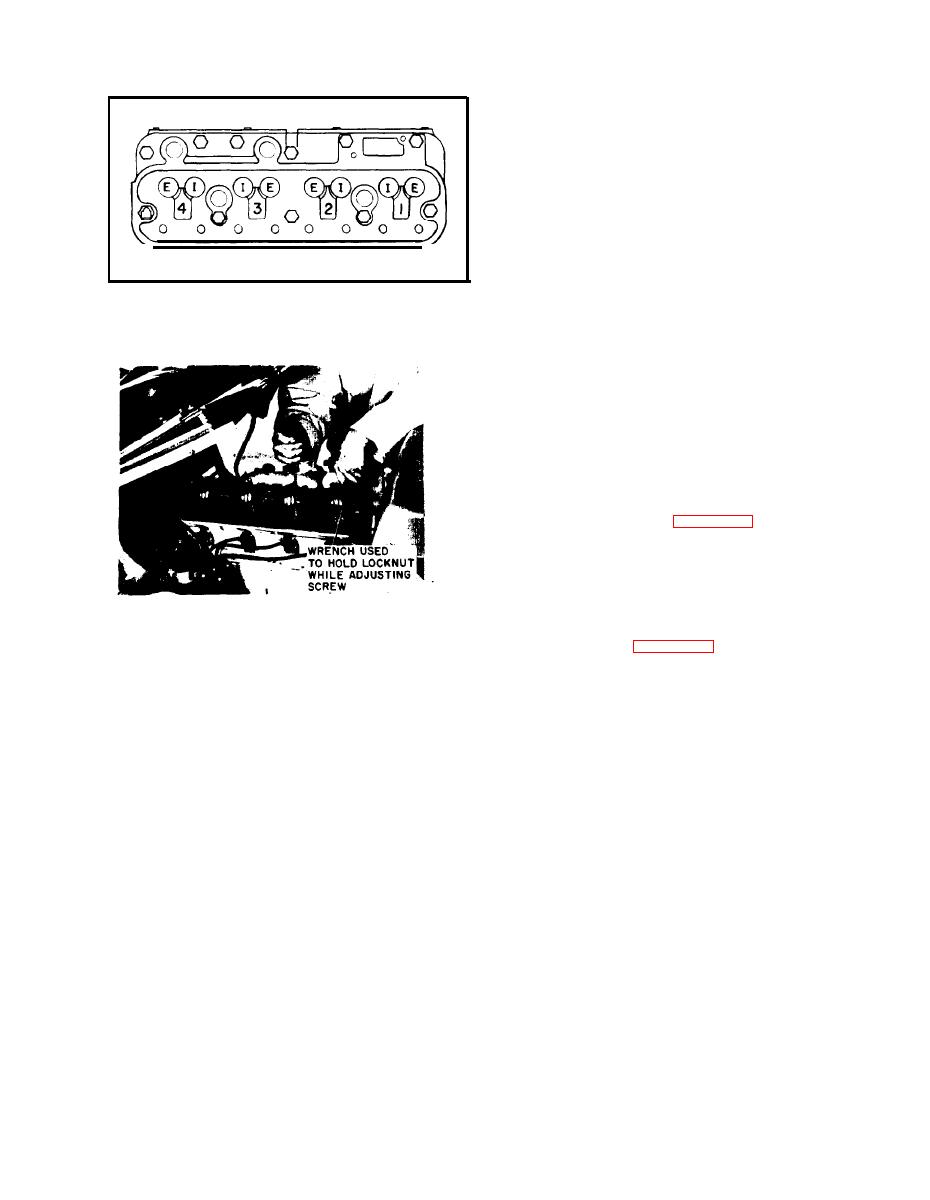
Figure 4-41. Valve Arrangement
c. Jar the rocker arm cover with the heel of your
hand or a soft leather hammer to loosen the gasket
from the cylinder head.
d. Remove the rocker arm cover.
e. "Bump" the starter and crank the engine until
the No. 4 (farthest from fan end) exhaust valve is
fully up and intake valve is just starting its
downward stroke, At this point the No. 1 valves
should both be up. See figure 4-41.
f. Loosen the lock nut and the adjusting screw on
the rocker arm stud and with a flat feeler gauge
adjust the intake valve clearance to have 0.010
inch. Adjust the exhaust valve to have 0.020 inch
clearance - engine hot (normal water jacket
Figure 4-42. Setting Valve Lash
temperature). See figure 4-42.
g. Now tighten the lock nut and continue with
4 - 3 9 . VALVE
CLEARANCE
(LASH)
the other valves by cranking the engine until No. 3
ADJUSTMENT. Maintaining the proper valve lash
exhaust valve is up and intake valve is just starting
setting is one of the most important factors
down. Now check and adjust No. 2 cylinder valve
relating to excellent engine performance and long
clearance as outlined in steps e, f and g above.
life. Valve lash that is adjusted too tight causes the
valves to operate too early and close too late. This
h. Crank engine until No. 1 exhaust valve is fully
does not allow the valve to remain on the seat long
up and intake valve is just starting down. Check
enough to cool properly and results in early valve
and adjust No. 4 cylinder valve clearance.
warping and burning. When the valves are allowed
to operate with too loose a setting, they open too
i. Finally, crank engine until No. 2 exhaust valve
late and close too early. When this condition exists,
is fully up and intake valve is just starting down.
the ramp on the camshaft lobe, which slows down
Check and adjust valve clearance for No. 3
the closing of the valve before it contacts the seat,
cylinder.
is not allowed to perform its function. Therefore,
the valve strikes the seat while traveling at a very
j. After all adjustments are made, clean the
high speed, resulting in increased valve and
gasket surfaces, install a new valve cover gasket,
camshaft wear and possible breakage of the valve
and replace the valve cover.
due to the high impact force.
4-31
|
|
Privacy Statement - Press Release - Copyright Information. - Contact Us |
