 |
|||
|
|
|||
|
|
|||
| ||||||||||
|
|
 (6) Connecting rods are numbered according to
(main) bearings can be replaced without removing the
cylinder bore in which they must be installed. Number
engine, if shaft does not have to be removed. However,
one cylinder is at the fan end of the engine. Oil squirt
it is usually recommended seals and gaskets be
hole in rod should be installed toward camshaft side of
replaced at this time (which would require engine
engine. Crankshaft journal should be at bottom dead
removal) if engine has had long service without major
center of cylinder bore in which piston and rod is being
maintenance. In this case remove engine first to make
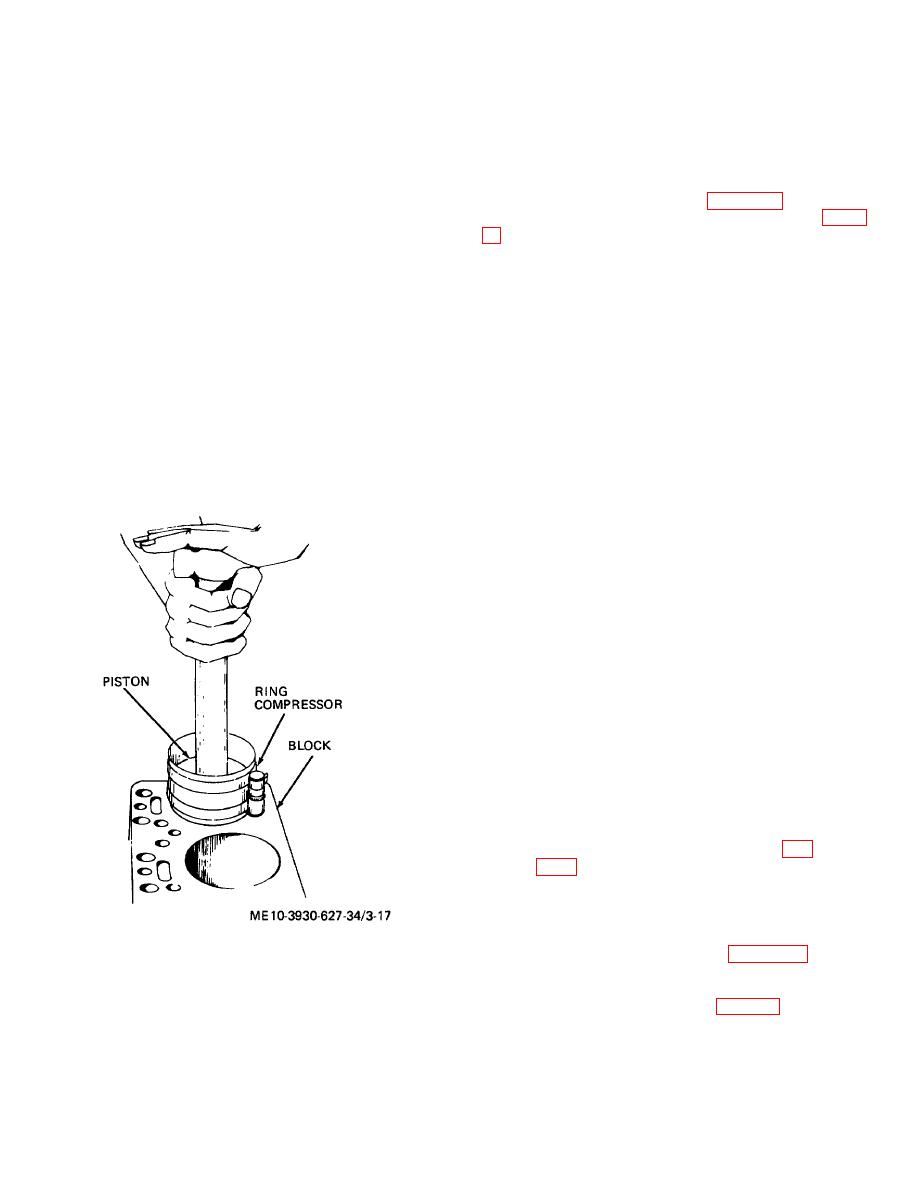
installed. Use a hammer handle to force piston through
entire job easier.
compressor into cylinder bore. While forcing piston into
(1) Remove the oil pump. (para 3-10.)
bore, ring compressor must be kept tight against
(2) Mark the bearing caps (13, 14, and 15, fig. 3-
cylinder block to prevent damage to piston rings as they
These caps are not
enter bore.
interchangeable, nor are they to be reversed side for
(7) Apply a light coat of oil to connecting rod
side at installation.
bearing cap and install lower half of the connecting rod
Note.
bearing in cap, making certain that bearing lock fits in
To keep crankshaft supported, if
machined notch of rod. Apply a light coat of oil to
engine is not removed, one pair of
bearing and install bearing cap and bearing on
bearings should be replaced at a
connecting rod. Tighten nuts to 35 to 40 foot-pounds
time, leaving bearing cap screws
torque. Install cotter pins in nuts.
snug but not tight when installing
(8) Complete installation of pistons.
Before
until all bearings are replaced.
replacing the engine head, squirt a few drops of oil
(3) Remove safety wire from main bearing cap
around edges of pistons to help lubricate rings when
screws and remove cap screws and caps from engine
starting engine.
block.
(9) Complete installation by reversing removal
(4) Remove bearing halves (10, 11 and 12) from
procedure.
caps.
(5) Insert bearing removing tool or flat head rivet,
with head thickness less than that of bearing shell, into
oil hole in the crankshaft journal. Rotate crankshaft so
that tool or rivet forces upper bearing half out of engine
block. Make certain to rotate crankshaft in proper
direction so that bearing lock is pushed out of notch in
engine block.
(6) Coat new bearing half with engine oil and
insert in same manner as old bearing half was removed.
(7) Coat lower bearing half with engine oil and
insert in bearing cap.
(8) Install bearing cap following procedure in step
b. below to check clearances. After clearance is
checked, leave cap screws loose so other bearings may
be accurately checked.
(9) Replace remaining bearings in same manner.
Note.
Be sure thrust side of center
(flanged) main bearing lower half is
flush with thrust side of upper half,
then check crankshaft end play (fig.
0.006 inch.
(10) Torque main bearing cap screws to 85 to 95
foot-pounds. Safety wire front and rear main bearing
cap screws.
(11) Mount oil pump to block. (para 3-10c.)
Figure 3-17. Installing pistons with ring compressor.
(12) Safety wire center main bearing cap screws
after pump installation.
3-13. Crankshaft and Bearings
(13) Install oil pan and seals (para 3-9).
a. Replacement of Crankshaft Bearings. Crankshaft
3-13
|
|
Privacy Statement - Press Release - Copyright Information. - Contact Us |
