 |
|||
|
|
|||
|
|
|||
| ||||||||||
|
|
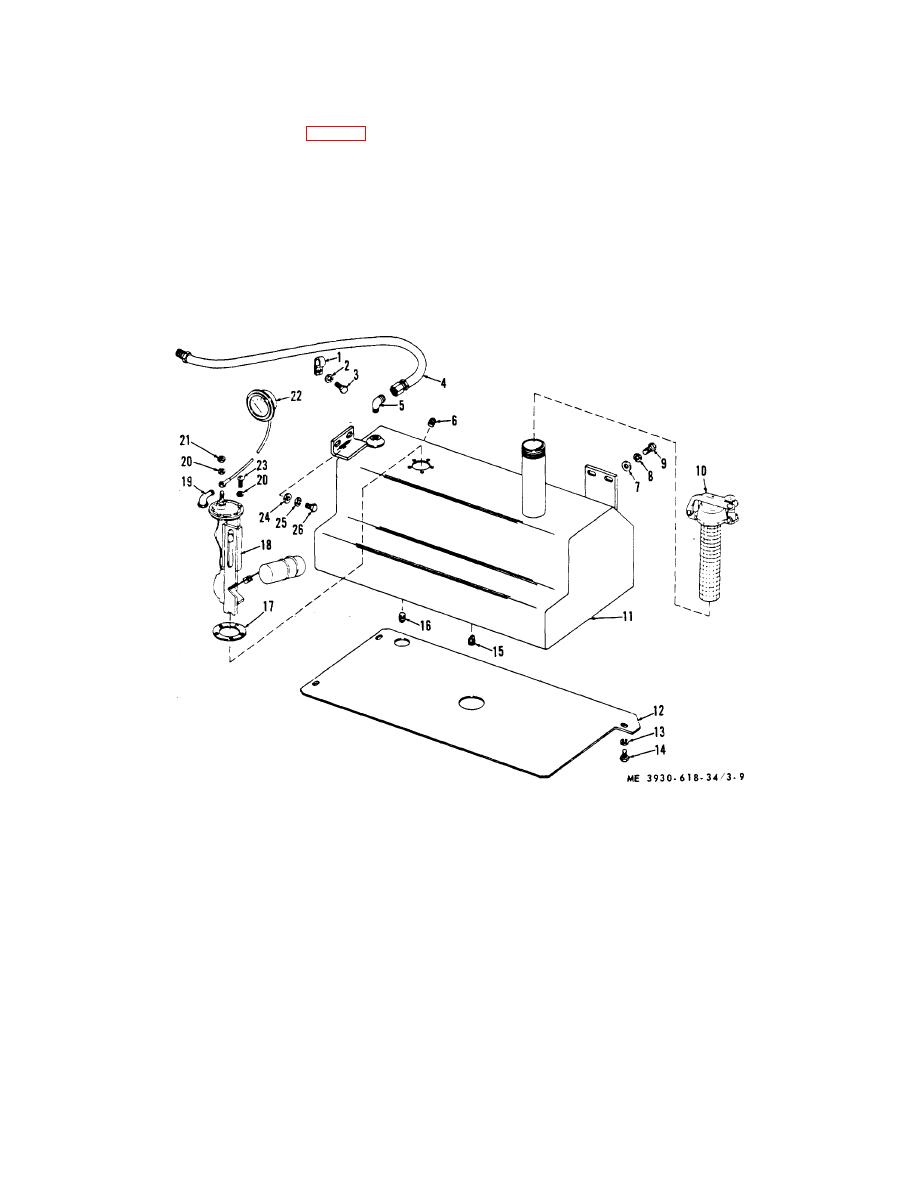 (1) Flush tank with solvent and dry with
3-10. Fuel Tank
compressed air.
a. Removal and Installation. See TM 10-3930-
(2) Inspect tank for rust, cracked seams, or
618-20.
damaged threads.
b. Disassembly.
(3) Inspect accessories for damage or
(1) Remove drain plug (16, fig. 3-9).
corrosion.
(2) Remove filler cap (10) assembly by
d. Repair.
unscrewing from top of tank.
(1) I damage is such that welding can be used
(3) Remove five screws (23) and lockwashers
to repair the tank, be sure to flush tank thoroughly to
which mount fuel gauge sending unit (18) in fuel tank,
remove all traces of explosive solvents and fuel, both
and carefully lift unit out of tank. Be careful not to bend
liquid and vapor.
the float arm during removal or installation.
(2) If damage is beyond reasonable welding
c. Cleaning and Inspection.
repair, replace tank and accessories as authorized.
1 Clamp
14 Capscrew
2 Lockwasher
15 Drain plug
3 Capscrew
16 Drain plug
4 Fuel line
17 Gasket
5 Elbow
18 Fuel sender
6 Plug
19 Boot
7 Washer
20 Lockwasher
8 Lockwasher
21 Nut
9 Capscrew
22 Fuel gage
10 Filler cap and screen
23 Screw
11 Fuel tank
24 Washer
12 Guard
25 Lockwasher
13 Lockwasher
26 Capscrew
Figure 3-9. Fuel tank.
3-14
|
|
Privacy Statement - Press Release - Copyright Information. - Contact Us |
