 |
|||
|
|
|||
|
|
|||
| ||||||||||
|
|
 c. Adjusting gap. Adjust the gap by bending the
b. Removal.
outside electrode. Never bend the center electrode.
(1) Tag and disconnect the wires going to the
ignition coil.
Use a round wire feeler gage for measuring. Adjust
for 0.025 inch gap.
(2) Loosen clamp holding ignition coil.
(3) Remove coil.
d. Testing. After cleaning and adjusting the gap,
c. Installation. Reverse procedure in b above.
test all spark plugs in a standard spark plug testing
machine. Discard all plugs that test unsatisfactorily.
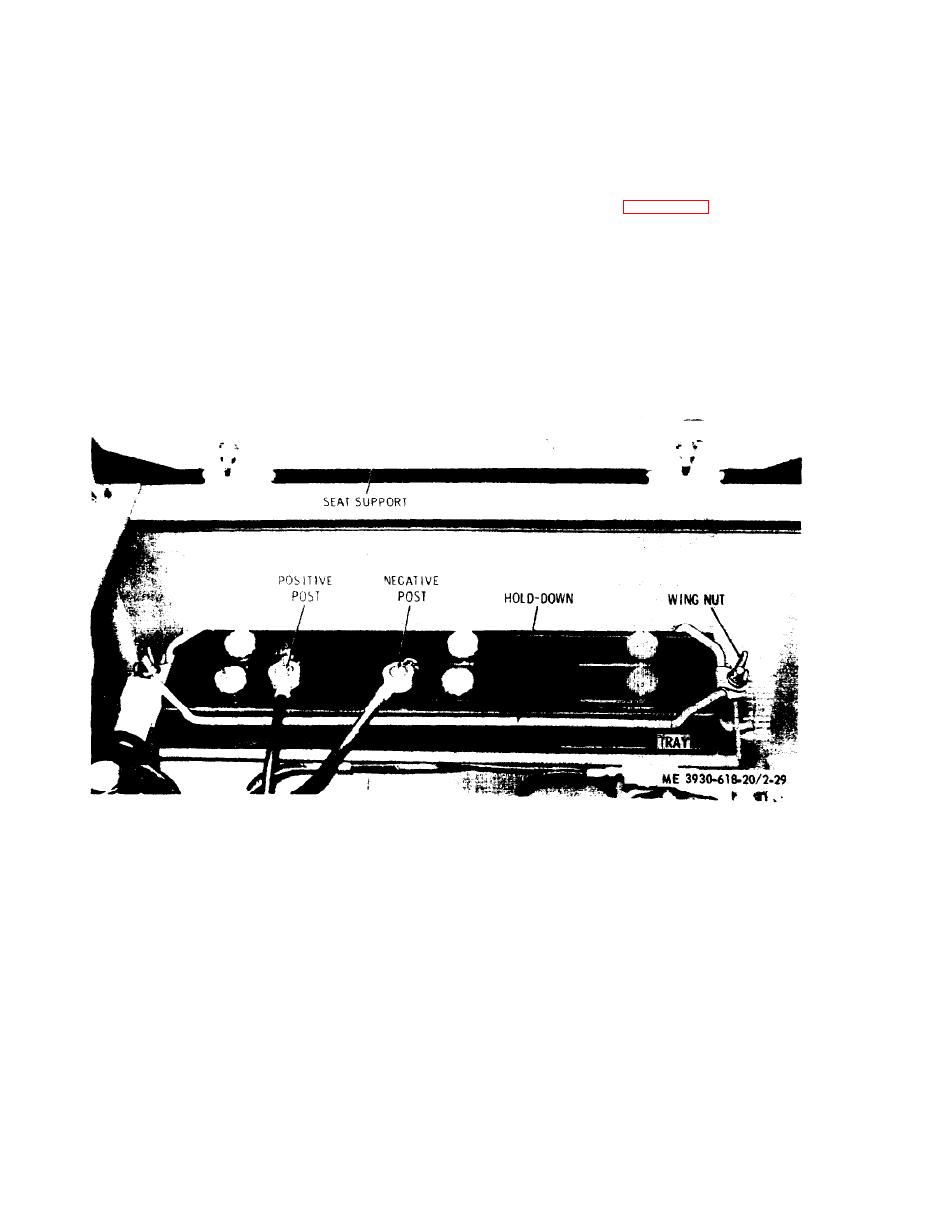
2-37. Battery and Cables
e. Installation.
a. Removal. Refer to figure 2-29 and remove the
battery as follows:
(1) Always use new copper gasket.
(1) Remove the operator's seat.
(2) Tighten plugs by hand and then torque to
(2) Remove the wingnuts from the holddown
15-20 foot-pounds.
studs and remove the battery holddown.
(3) Connect spark plug wires to the correct plugs.
(3) Remove both cables from the battery posts.
To prevent accidental damage to the battery posts or
2-36. Ignition Coil
cable terminals, use a cable terminal puller tool to
a. Inspection. Inspect ignition coil to see if case is
remove the cables.
cracked or if oil is leaking from case. Replace a defective
(4) Tilt the battery towards the rear of the truck
ignition coil.
and lift it out of the battery tray.
Figure 2-29. Battery and cables. installed view.
b. Cleaning.
(3) Take a specific gravity reading of the electro-
(1) Clean the top of the battery, posts, and cable
lyte using a hydrometer. If the specific gravity reading
terminals with a solution of baking soda and water.
is 1.225 or lower, recharge the battery. A fully charged
(2) Make sure that all fittercaps are tight to
battery will read from 1.265 to 1.290 specific gravity.
d. Installation. Reverse procedures in a above.
prevent any solution from entering the cells.
(3) After foaming stops. flush the battery and
Apply a coating of petroleum jelly to the battery posts
before connecting the cable terminals.
cable terminals with clean, fresh water.
c. Inspection and Testing.
2-38. Gages and Instruments
(1) Inspect cables for broken strands, defective
All gages and instruments are mounted on the instru-
insulation, or damaged terminals.
(2) Inspect the battery for cracks, breaks, or
ment panel and may be removed by disconnecting the
wiring from the individual gage or instrument and
other defect's,
2-36
|
|
Privacy Statement - Press Release - Copyright Information. - Contact Us |
