 |
|||
|
|
|||
|
Page Title:
DRIVE UNIT DISASSEMBLY/REASSEMBLY |
|
||
| ||||||||||
|
|
 TM 10-3930-644-14&P
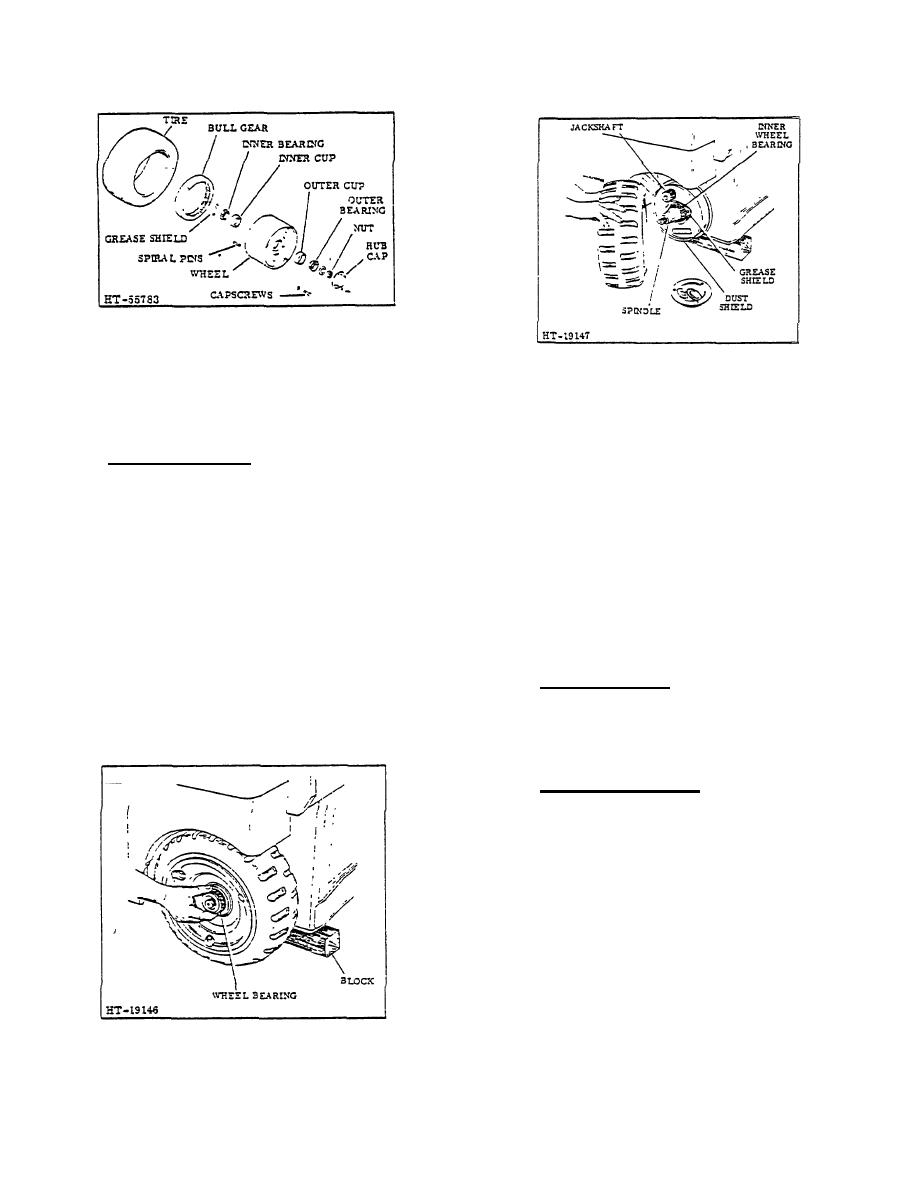
Figure 4. Drive Wheel Assembly
C. DRIVE UNIT DISASSEMBLY/REASSEMBLY
Figure 6. Removing Drive Wheel
The following operations may be performed without
and retaining nut.
The outer wheel
removing the drive unit from the truck.
bearing can now be removed.
1. Drive Wheel Removal
c. After the outer wheel bearing has been
removed, the wheel can be removed.
The wheel assembly consists of the wheel, tire.
(See Figure 6.)
brake drum. wheel bearings and the bull gear.
(Figure 4.)
CAUTION
When removing wheel, exercise care
To remove the wheel:
so that no damage to the drum or
brake shoes occurs.
a. Raise the truck sufficiently so that the
drive wheel clears the floor. This may be
d. After the drive wheel has been removed,
done by tilting the mast to Its full backward
the inner wheel bearing and the grease
position and inserting a block under the
shield can be removed.
mast assembly, then tilting mast to its
vertical position. (See Figure 5.)
2. Inspection - Service
b. Remove capscrews, lockwashers and hub
Using a solvent, wash all grease from the bearings and
cap. Remove cotter pin, washer
bearing surfaces. Inspect for worn or damaged parts
and replace where necessary.
a. Replacing Bearing Cups
(1) Recesses are provided on the inner hub of
the drum; insert a brass drift at these
points, tap lightly with a hammer and
remove cup.
(2) When replacing bearing cups, set in hub
with taper to the outside of the wheel.
Using a brass drift, tap evenly around the
edge of the cup, exercising care so that
;he cup will not bind (bearing press can
also be used for installation).'
NOTE
Bearing cup should be a press fit.
Figure 5. Removing Wheel Bearing
3-137
|
|
Privacy Statement - Press Release - Copyright Information. - Contact Us |