 |
|||
|
|
|||
|
|
|||
| ||||||||||
|
|
 TM 10-3930-644-14&P
contact point lock screw. After tightening lock
or protective rubber grommet. Remove retaining
screw, recheck point gap with .020" feeler
ring and remove breaker cam from shaft.
gauge.
4. Using a sharp or pointed Instrument, scribe a
light mark on shaft coupling and shaft prior to
NOTE
removing coupling. This will assist in proper
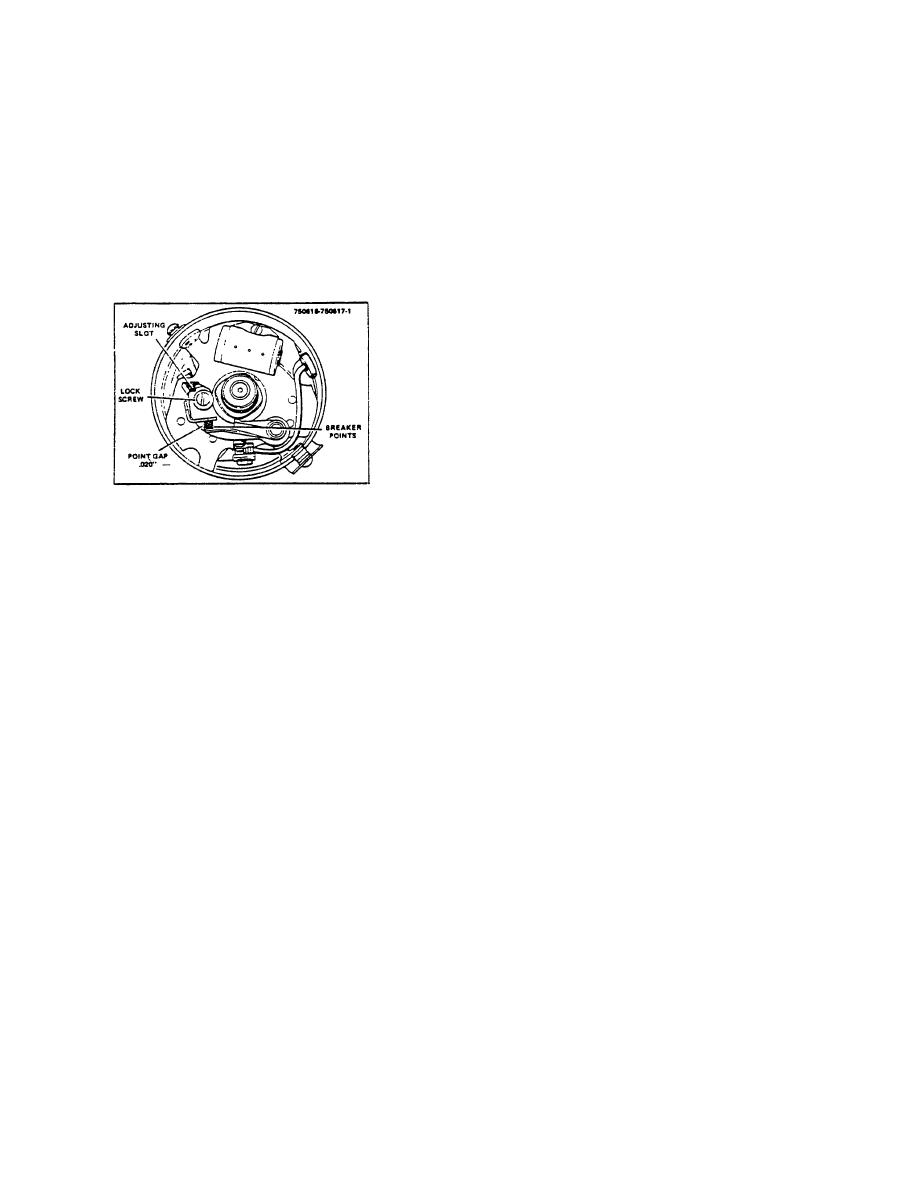
Contact gap should be .017" to .022"
alignment during reassembly.
with a maximum adjusted gap at
.020".
5. Grind head off coupling retainer ;in and remove
5. Install dust cover, rotor and distributor cap.
pin, coupling, and seal from shaft. Shaft and
weight support can now be removed from the
distributor housing.
6. Remove screws, washers, and weight base and
shaft from body.
7. Remove weight springs, weights and advance
cam from shaft.
E. INSPECTION
Clean all carts thoroughly and replace any damaged or
worn parts.
NOTE
Figure 5-1. Adjusting Contact Gap.
Do not attempt to clean distributor
cap, dust cover, rotor, condenser or
C. REMOVAL
housing
in
any
degreasing
compound, since this may damage
1. Remove the spark plug cables from the spark
parts.
plugs, and label each one as it is disconnected.
Remove the ignition coil cable from the ignition
1. Check centrifugal advance parts, weights,
coil cap.
springs and plate for evidence of wear or
damage.
2. Disconnect the primary lead at the coil terminal.
2. Replace dust cover seal i f hard, worn, or dirty.
NOTE
Distributor
can
be
removed
3. Replace point contact set if worn, burned or
overhauled and replaced without
badly pitted.
retiming engine if distributor is
returned to it's original position.
4. Check breaker lever rubbing block for excessive
Mark side of distributor, noting
wear.
position of rotor before removing
distributor from engine.
5. If
distributor
housing
bushing
requires
replacement, exercise care ,when replacing so
3. Remove nut and lockwasher from clamp stud
as not to scratch or scuff the inside or outside of
and carefully lift distributor out of cylinder head.
the bushing. Do not ream, scrape or file the
bushing.
D. DISASSEMBLY
See Figure 5-2.
6. Check condenser for leakage. If it cannot be
1. Unlock distributor cap retaining clips and remove
properly tested, then replace it with condenser of
distributor cap, rotor and dust seal.
same value.
2. Remove the contact points and condenser.
7. Check the distributor cap and rotor for cracks,
burning of contacts or carbon streaks.
3. Remove screws and carefully remove breaker
plate assembly from housing, taking care not to
F. REASSEMBLY
tear primary lead
During assembly of the distributor, make
3-99
|
|
Privacy Statement - Press Release - Copyright Information. - Contact Us |
