 |
|||
|
|
|||
|
Page Title:
Wheel cylinder disassembly and inspection. |
|
||
| ||||||||||
|
|
 (1) Fill master cylinder with specified brake fluid.
CAUTION
Do not use cutting pliers to grasp springs
(2) Remove screw in bleeder fitting and slip piece of
for removal. Any resulting nicks make
small hose about 18 inches long over end of fitting.
spring subject to failure.
(3) With a second man applying pressure to pedal,
(3) Hold pin from rear of backing plate, press outer
crack open bleeder fitting to permit fluid to escape
antirattle. spring retainer in to compress spring, and
through hose into container of brake fluid. Look for
rotate it a quarter turn, to release it. Take off pin, spring
bubbles in escaping fluid.
and retainers, and remove brakeshoes.
(4) Continue pumping fluid until discharged fluid is
(4) Disconnect brake line, remove elbow, adapter
clear and free of bubbles, meanwhile maintaining level of
and washer from wheel cylinder. Disconnect bleeder line
fluid in master cylinder reservoir. Repeat at other wheel
at cylinder. Remove two capscrews and lockwashers
if both brakes were serviced.
and lift off wheel cylinder.
g.
Adjustment.
Brake lining-to-drum operating
b. Wheel cylinder disassembly and inspection.
clearance is automatically adjusted with each application
of the brakes. There is no need to adjust the brakes
(1) Remove boots and push out cups, pistons and
manually.
spring from wheel cylinder. Discard boots and cups.
6-23. MASTER CYLINDER.
(2) Inspect cylinder bore for rust pits or scoring.
Discard cylinders which cannot be cleaned up with light
a. Removal.
honing.
(1) Unscrew bolt, fitting and stoplight switch from
c. Wheel cylinder reassembly. Wet internal parts in
master cylinder. Do not disassemble this group of parts.
specified hydraulic brake fluid, and reverse b. (1) above.
(2) Remove cotter pin (Figure 6-7) and clevis pin
d. Brakeshoe. Inspect brakeshoe lining and replace
from push rod yoke, remove two nuts and washers,
shoe and lining assembly as required. I e. Installation.
through bolts, and master cylinder.
Turn cam bolts so brakeshoes will be held at furthest in
position, and reverse a. above.
b. Repair.
f. Brake bleeding. After assembly, bleed air from
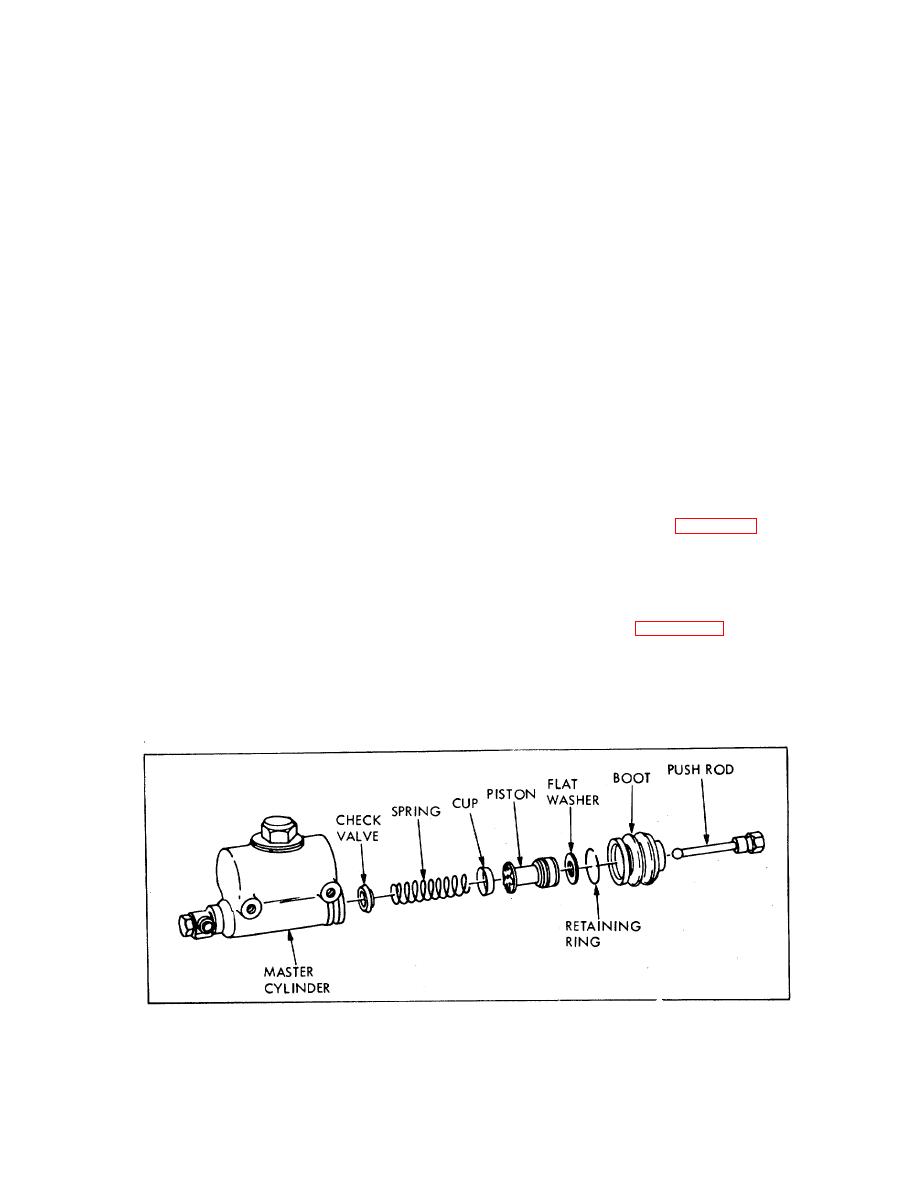
(1) Remove boot (Figure 6-10) and push rod, take
system
at
bleeder
fitting
as
follows:
out retaining ring, and remove washer, piston, cup,
spring and check valve.
Figure 6-10. Master Cylinder, Exploded View
62
|
|
Privacy Statement - Press Release - Copyright Information. - Contact Us |