 |
|||
|
|
|||
|
|
|||
| ||||||||||
|
|
 Section XI. COOLING SYSTEM
3-36. General
(12) on radiator and drain valve on engine inlet elbow
and drain coolant from system.
The engine cooling system consists of a centrifugal,
(3) Loosen clamp (3 and 5) and remove hoses (4
engine-driven, water pump, radiator, thermostat,
and 10) from radiator and engine.
cooling fan, and connecting hoses and tubes. A tank,
(4) Disconnect transmission oil cooler lines (para.
mounted below, and an integral part of the radiator,
3-54) from bottom of radiator.
cools the transmission oil. Capacity of the system is
(5) Remove four screws (6), flat washers (7) and
10 quarts.
nuts (9) securing radiator to side frames.
3-37. Radiator
(6) Slide bottom of radiator (1) out through radia-
tor grille opening. Ease radiator down until filler
a. Installation and Cleaning.
neck clears hole in counterweight and remove radia-
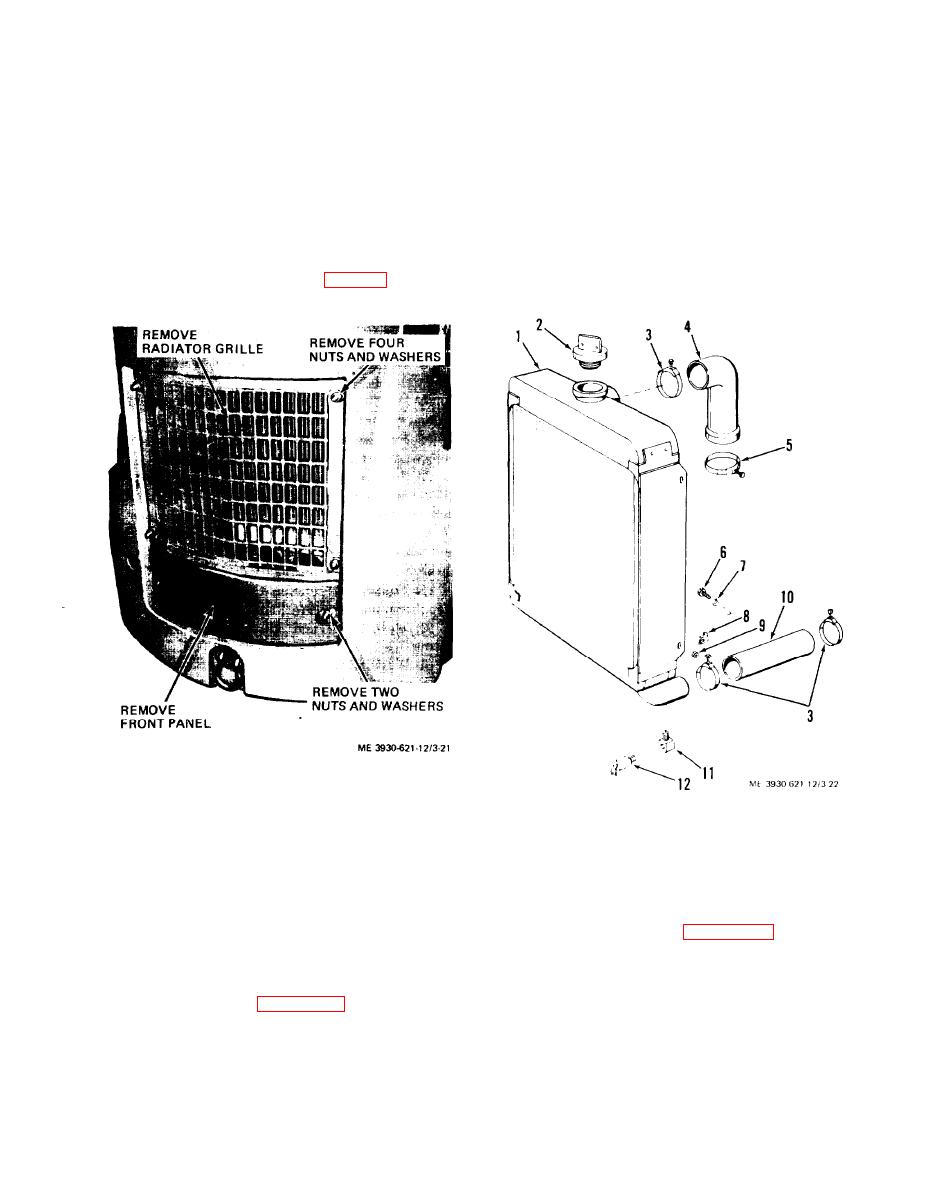
(1) Remove the radiator grille (fig. 3-21) and front
tor. Remove spacers (8).
panel.
Figure 3-21. Radiator grille, installed view
(2) Blow dirt, debris, and other objects lodged in
1. Radiator
radiator fins by directing a stream of compressed air
7. Flat washer
8. Spacer
2. Radiator cap
through the radiator from the engine side. Do not use
3. Hose clamp
9. Nut
4. Upper hose
10. Lower hose
steam, gasoline, fuel oil or kerosene.
5. Hose clamp
11. Elbow
(3) Check radiator for bent fins. Straighten fins
6. Screw
12. Drain valve
if possible. Use care so as not to puncture radiator
Figure 3-22, Radiator and hoses, exploded view
tubes.
(4) Inspect radiator and tank for leaks. Check and
tighten radiator mounts if required.
radiator as follows:
(5) Tighten hose clamps. Inspect hoses for leaks
(1) Slide radiator through radiator grille opening,
and deterioration.
with filler neck entering hole in top of counterweight.
Aline holes in radiator shroud with holes in frame.
radiator as follows:
Install spacers (8) in place on radiator. Secure radia-
(1) Remove seat and side panels.
tor (1) in place with four screws (16), flat washers
(2) Remove radiator cap (2) and open drain valve
(7) and nuts (9).
3-23
|
|
Privacy Statement - Press Release - Copyright Information. - Contact Us |