 |
|||
|
|
|||
|
Page Title:
Transmission Controls, Cleaning, Inspection and Repair |
|
||
| ||||||||||
|
|
 TM 10-3930-630-34
accomplished during the disassembly procedures.
(2) Disassemble the inching control
in
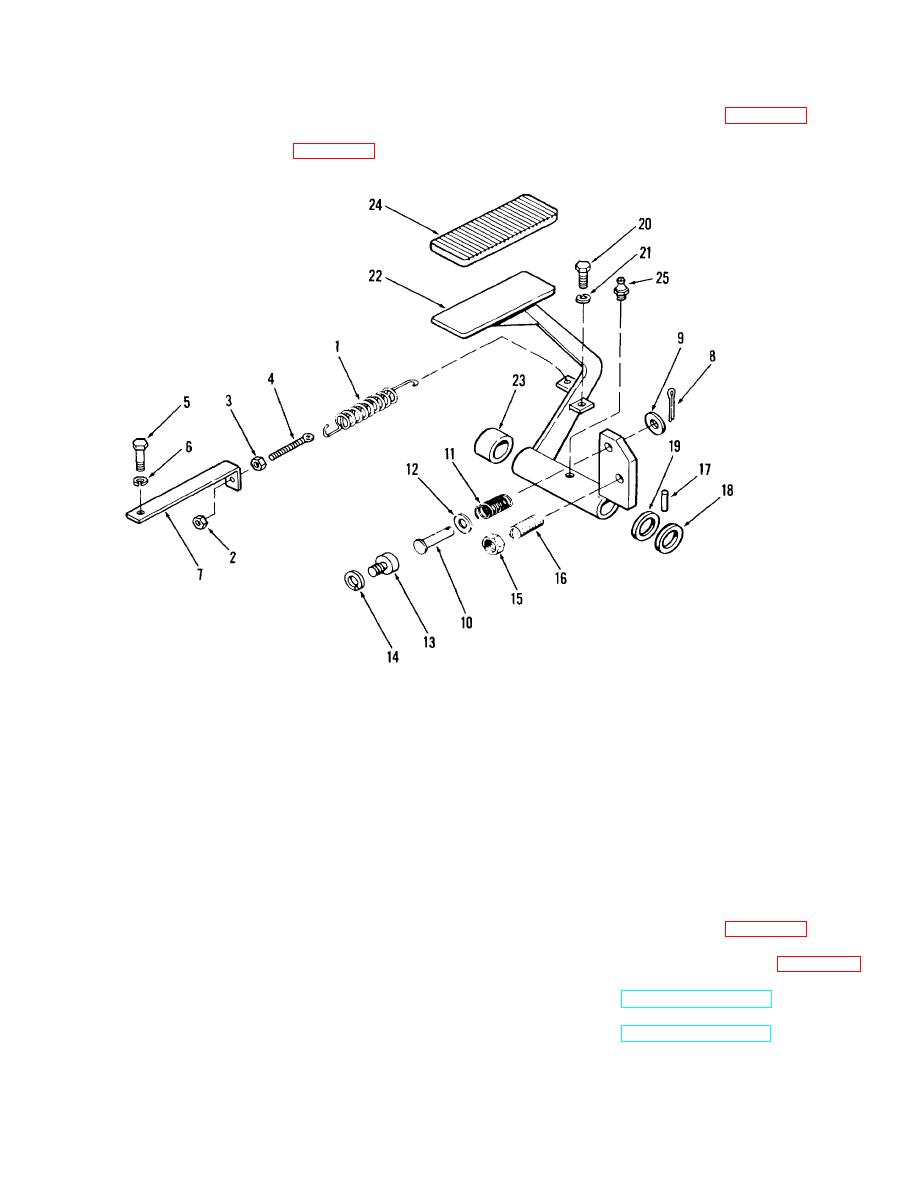
b. Disassembly.
numerical sequence as illustrated in figure 12-3.
(1) Disassemble the control lever linkage in
numerical sequence as illustrated in figure 12-2.
TA067486
1.
Spring
6. Nut
11.
Inching spring
16.
Setscrew
21.
Nut
2.
Nut
7. Anchor
12.
Washer
17.
Spring pin
22.
Inching pedal
3.
Nut
8. Cotter pin
13.
Inching button
18.
Washer
23.
Bushing
4.
Adjusting screw
9. Washer
14.
Lockwasher
19.
Washer
24.
Pall
5.
Screw
10. Pin
15.
Nut
20.
Screw
25.
Lubrication fitting
Figure 12-3. Inching control, disassembly and reassembly.
0.50 inches (12.7mm).
12-3.
Transmission Controls, Cleaning, Inspection
and Repair
12-4.
Transmission Controls, Reassembly and
a. Clean all metal parts in cleaning solvent (Fed.
Spec. P-D-680) and dry thoroughly.
Installation
b. Inspect shifting rod for bends, cracks and
a. Reassembly.
damaged threads. Replace rod if damage is noted.
(1) Reassemble the inching control in reverse
c. Inspect shifting lever for cracks, breaks or other
numerical sequence as illustrated in figure 12-3.
damage. Replace lever, bushing, collar or flange if
(2) Reassemble the control lever linkage in
damage is apparent.
reverse numerical sequence as illustrated in figure 12-2.
d. Inspect all threaded parts for stripped threads
b. Installation.
and replace if damage is noted.
(1) Refer to TM 10-3930-630-12 and adjust the
e. Inspect return spring and plunger spring for
transmission controls.
(2) Refer to TM 10-3930-630-12 and install the
proper free length. The return spring must have a free
floor and toe plates.
length of 9.94 to 10.06 inches (252.4 to 269.2 mm) and
the plunger spring free length must be
12-3
|
|
Privacy Statement - Press Release - Copyright Information. - Contact Us |
