 |
|||
|
|
|||
|
Page Title:
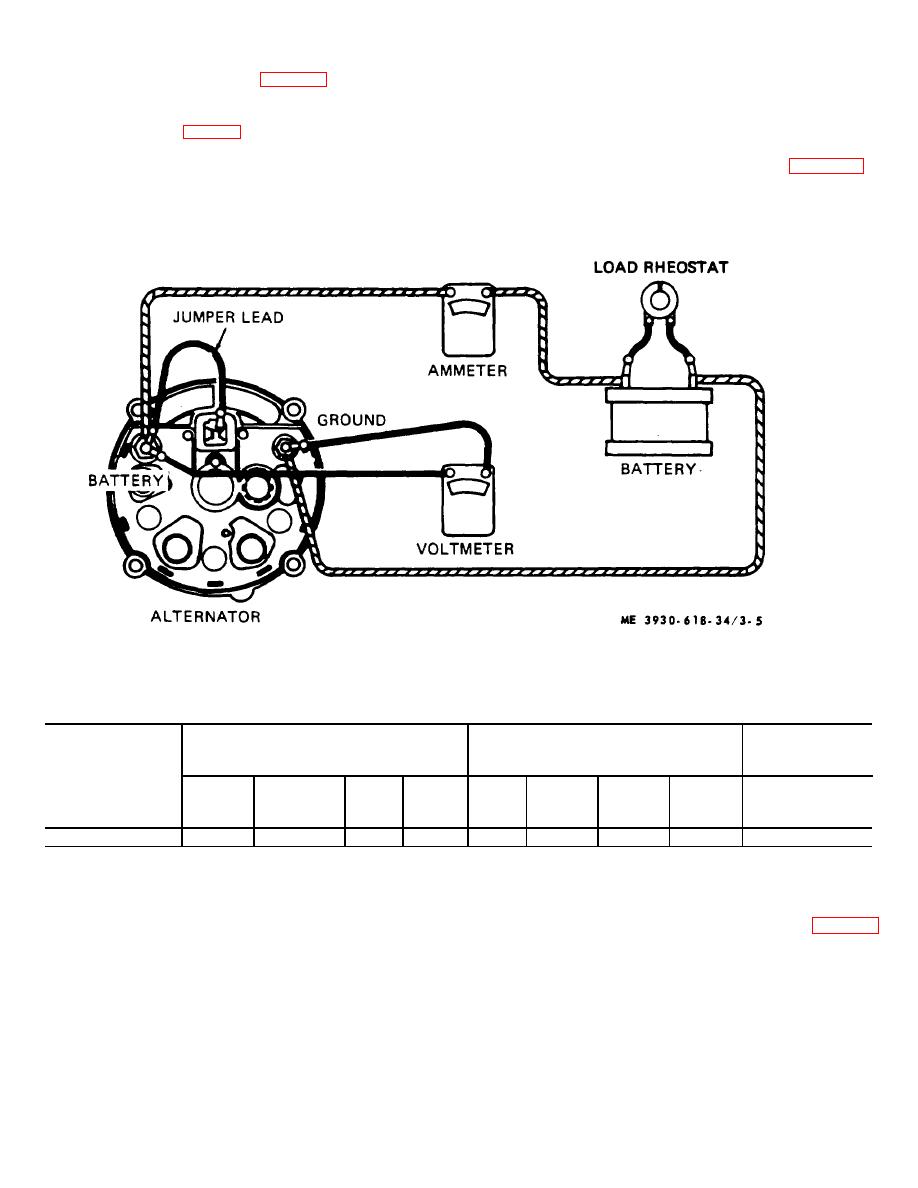
Figure 3-5. Checking alternator output. |
|
||
| ||||||||||
|
|
 (b) During reassembly, carefully note the
tape is removed.
(3) When alternator is assembled, withdraw the
alignment of parts as shown in figure 3-1.
e. Alternator reassembly.
brush retaining wire through the hole in the end frame,
allowing the brushes to contact the sliprings.
(1) The reassembly of the alternator is a reverse
f. Alternator test.
of the disassembly (fig. 3-1).
(1) To check the alternator on a test bench,
(2) Avoid excessively tightening the rotor in a
make an electrical hook-up as shown in figure 3-5,
vise as this could distort the entire rotor assembly. After
operate at specified speed and check for rated output.
installing the pulley assembly, tighten the shaft nut to 50-
See table 3-1.
60 ft. lbs. Before installing the slipring end frame
(2) Adjust the load rheostat, if necessary, to
assembly, remove the protective tape from the bearing
obtain, the desired output.
end shaft, making sure shaft is completely clean after
Figure 3-5. Checking alternator output.
Table 3-1. Alternator Specifications
Field current
Cold output
(80F)
at specified voltage
Rotation
Rated
viewing
Spec
Approx.
Amp
Approx.
hot output
D.E.
Grd
Amps
Volts
volts
Amp
R.P.M.
R.P.M.
amp
CW
Neg
1.9-2.3
12
14.0
12
1100
42
6500
42
(1) Secure starter motor in bench vise at drive
3-3. Starter Motor
end of unit. Be careful not to damage drive end housing.
a. Removal and Installation. Refer to TM 10-3930-
(2) Remove the two through bolts (15, fig. 3-6)
618-20 and remove or install the starter motor.
and slide commutator end frame (1) and field frame from
b. Disassembly. Disassembly should pro-
armature.
ceed only so far as is necessary to make repairs or
replace defective parts.
3-5
|
|
Privacy Statement - Press Release - Copyright Information. - Contact Us |
