 |
|||
|
|
|||
|
|
|||
| ||||||||||
|
|
 TM 10-3930-673-20-2
15-2. COUNTERWEIGHT REPLACEMENT (CONT)
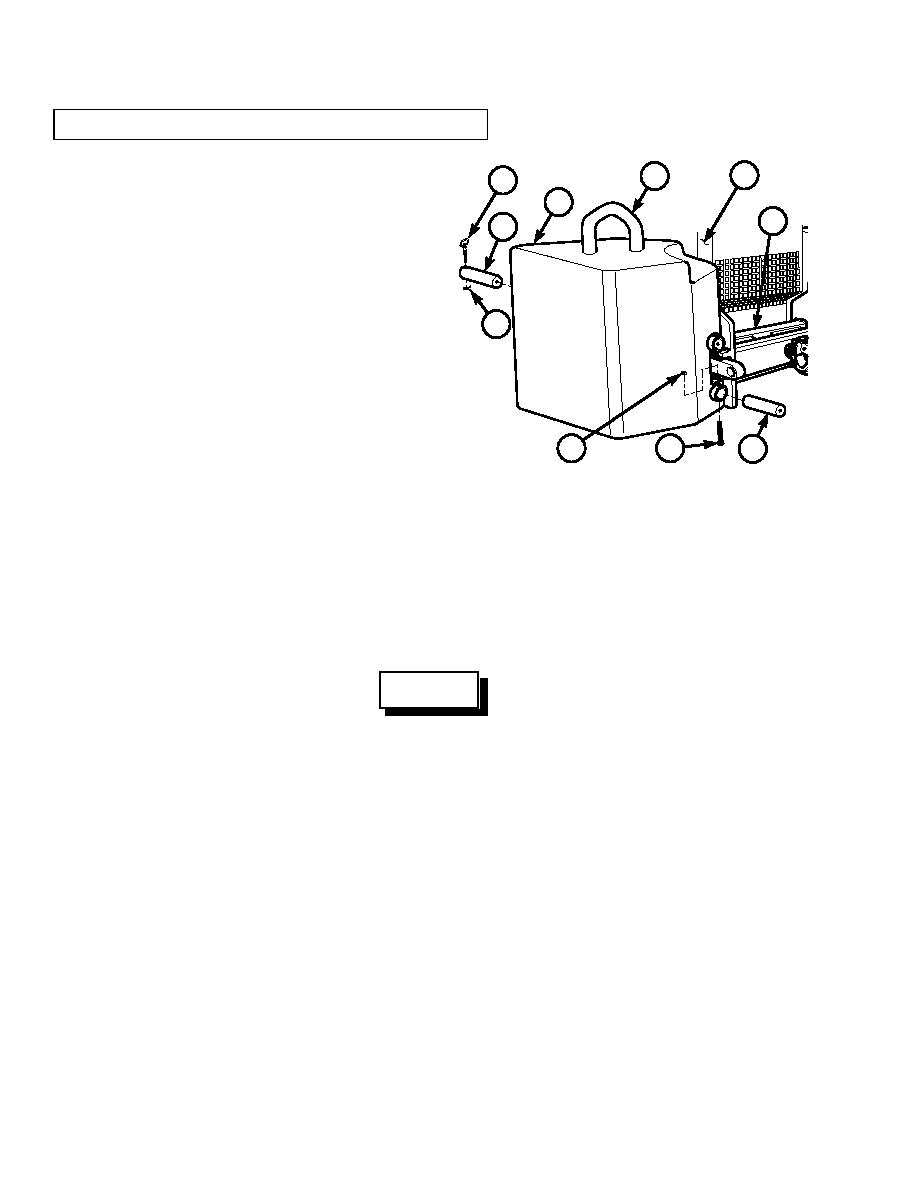
c. Removal of One Counterweight.
6
1
5
(1)
Position lifting forklift fork (or other lifting
2
device) in lifting eye (1) on top of side
7
3
counterweight (2) to be removed.
(2)
Raise forks just enough to release tension
from pins (3 and 8).
4
(3)
Remove two clips (4), pins (5), and pins (3)
from side counterweight (2) to be removed
and frame mounts (6).
(4)
Remove two locknuts (9), screws (10), and
pins (8) from side counterweight (2) to be
removed.
9
10
8
(5)
Using forklift (or other lifting device),
TR00833
remove side counterweight (2) from center
weight (7) and vehicle frame mounts (6).
(a)
Lift side counterweight (2) to be removed approximately one inch and then tilt fork tips up just enough to
clear counterweight from vehicle frame mounts (6). Carefully remove counterweight (2) from vehicle.
(b)
Back lifting forklift away from vehicle and then lower counterweight (2) to ground.
d. Installation of One Counterweight.
WARNING
Use extreme care when lifting counterweight with a forklift. Never allow forks to tip forward. Always
tie counterweight lifting eyes to the lifting forklift.
NOTE
Weight of single counterweight (1) is 2800 lbs (1270.1 kg). Use a forklift of at least 6000 lbs (2721.6
kg) capacity for lifting counterweight.
(1)
Position forklift fork (or other lifting device) in lifting eye (1) on top of side counterweight (2).
(2)
Using forklift (or other lifting device), position side counterweight (2) on vehicle frame mount (6).
(a)
Lift counterweight (2) and move to rear of vehicle.
(b)
Raise counterweight (2) until pin holes in counterweight align with pin holes in vehicle frame mount (6).
(3)
Apply anti-seize compound to two pins (8) and install pins in side counterweight (2) with two screws (10)
and locknuts (9).
15-4
|
|
Privacy Statement - Press Release - Copyright Information. - Contact Us |
