| |
TM 10-3930-671-24
Lift Chain (Fork Height) Adjustment
NOTE
It is important to make the lift chain
adjustment check with a rated load to
be sure that the chains are stretched
to their maximum length.
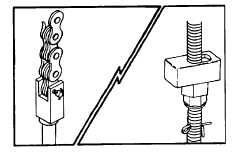
Figure 2. Typical view of chain anchors.
The lift chains are mounted to the chain anchors on the
lift carriage and at the chain anchor rods near the lift
cylinder piston head. The lift chains can be adjusted by
loosening or tightening the chain anchor nuts.
Lift chains should be adjusted to provide equal tension in
each strand of chain. Lift chains are correctly adjusted if
the lower fork carriage rollers reach their end (lowest)
position approximately 0.50 inch (13 mm) from the lower
edge of the inner rail. This also positions the bottom of
the forks the same (equal) distance above the floor.
1.
To check this dimension, raise the carriage to a
height that exposes several inches of the inner
rail at the roller path. Apply a layer of grease to
the roller path on the inner rail. Lower the
carriage, pick up a rated capacity load, tilt the
upright back slightly, and raise the load until the
carriage rollers have passed over the greased
area. Lower the load completely and remove the
load from the forks. Raise the carriage again to
expose the inner rail. You can now check the
roller path pattern in the grease and determine
the correct adjustment of the chains.
2.
Adjust lift chains as necessary.
3.
Inspect the lift chain anchors at both ends of
chain.
Be sure both nuts, for each chain anchor, are in place.
Be sure there is a cotter pin in the end of
each anchor.
4.
As an alternate check procedure, the lift carriage
chains should be adjusted so that the bottoms of
the forks are 0.50 inch (12.1 mm) above the
floor.
Lift Chain Inspection and Measurement for Wear
WARNING
Do not attempt to repair a worn chain.
Replace worn or damaged chain or
injury to personnel and damage to
equipment could result.
1.
Inspect the lift chains every truck PM (50-250
hours).
When
operating
in
corrosive
environments, inspect the chains every 50
hours.
2.
During inspection, check for the following chain
conditions:
•
Rust and corrosion
•
Cracked plates
•
Raised or turned pins
•
Tight joints
•
Wear, e.g. worn pins or holes
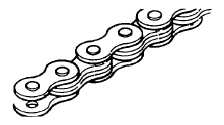
Figure 3. Illustration of typical chain wear and damage.
3. When the pins or holes become worn, the chain
becomes longer. When a section of chain is 3
per cent (%) longer than a section of new chain,
the chain is worn out and must be discarded.
4. Chain wear can be measured by using a chain
scale or a steel tape measure. When checking
chain wear, be sure to measure a segment of
chain that moves over a sheave.
F-499
|


