| |
TM 10-3930-671-24
C.
SUPPLEMENTARY INSPECTION
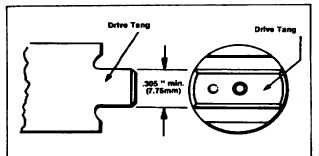
1. Drive Shaft Measure the distance across the flats of
the drive tang which must not be less than .305"
(7.75mm). The shaft diameter in the drive shaft seal area
must be free of nicks and scratches for the seals to
function properly. Moderate shaft wear from the seal lips
is normal (Figure 4.1).
FIGURE 4.1.
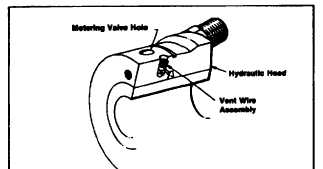
2. Hydraulic Head Check the vent wire assembly in the
hydraulic head for freedom of movement. If the wire is
free, flush the head and blow out all passages with clean,
dry air (Figure 4.2). If vent wire is stuck in screw
assembly, remove and replace after a thorough cleaning
of the assembly and hydraulic head passage.
Do not immerse this head in solvent for extended
periods; sealant damage will result.
FIGURE 4.2.
3. Distributor Rotor Examine the radii contacted by the
leaf spring and the tang slot for excessive wear. Check
all slots, charging and discharge ports for chipping of
edges or dirt, and the rotor shank for major
scratches. Slight erosion on the edge of the discharge
port is considered normal. If damage or excessive wear
is apparent, the head and rotor must be replaced as a
matched unit. Final check for excessive wear on the
rotor should be performed on the test stand by checking
for minimum cranking delivery.
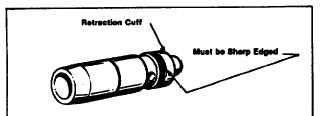
4. Delivery Valve Inspect delivery valve retraction cuff
for chipping or erosion of edges (Figure 4.4).
FIGURE 4.4.
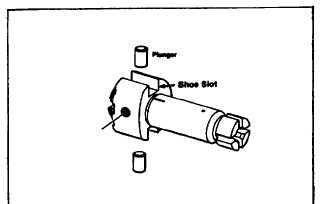
5. Plungers While holding the rotor under clean oil,
insert the plungers into their bore. With thumb and
forefinger over the shoe slots, tilt from side to side
several times to determine complete freedom of
movement. Interchanging or reversing their initial
positions may be necessary, as these are matched parts.
If the plungers are sticking, but not visibly damaged,
clean both plungers and bore with a soft brush and a
solvent such as lacquer thinner or acetone (Do not force
plungers into their bore and do not handle rotor shank.)
(Figure 4.5).
FIGURE 4.5.
F-233
|


