| |
TM 10-3930-671-24
e)
Check engine oil to see if it contains
coolant.
f)
Check
that
radiator
cap
has
correct
pressure rating. Replace if incorrect.
g)
Pressure test the radiator cap. Replace if
faulty.
h)
Pressure test the radiator and cooling
system. Repair any leaks or blockage.
i)
Test the engine thermostat. Replace as
needed.
Cooling System Inspection
WARNING
Use extreme care when removing the
cap from the radiator. It is good safety
practice to use a shop cloth to cover
the radiator cap while it is being
removed. Wrap the cloth around the
cap and turn cap slowly to the first
stop. Step back while the pressure is
released from the system. When you
are sure all of the pressure has been
released, press down on the cap with
the cloth in place, turn, and remove the
cap. Stand clear of the radiator
opening; hot coolant may splash out.
Failure to follow these instructions
could result in serious personal injury
from hot coolant or steam blowout
and/or damage to the cooling system or
engine.
NOTE
A coolant solution containing 50%
ethylene
glycol
provides
freezing
protection to -34°F (-37°C).
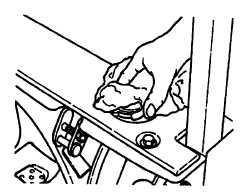
1.
Remove the radiator cap.
2.
Inspect the condition of the coolant. Look for
excessive contamination, rust, or oiliness, and
gummy deposits in the coolant solution. The
coolant should have a clean appearance.
3.
Check the PM time Interval, or the condition of
the coolant, to determine if it needs to be
changed (drained and replaced).
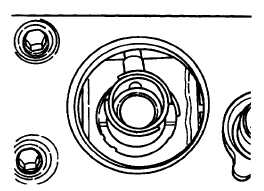
4.
Inspect the radiator cap. Check condition of
upper and lower rubber seals (with overflow
reservoir, cap has two seals). Check the seal
holder and spring for correct movement and
operation. The rubber seal face should be clean
and not damaged. Look for nicks and cracks in
the seals. Replace the cap if it is defective.
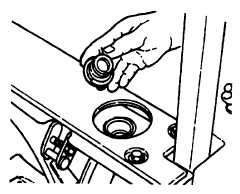
5.
Be sure the radiator cap has the correct
pressure rating. System Pressure (Radiator
Cap) 14 psi, nominal.
Refer to Section 2.1, Service Specifications, Cooling
System.
6.
Inspect the radiator cap sealing surfaces located
in the radiator filler neck. Look for nicks, deep
scratches, or damage which may cause radiator
cap leakage.
7.
Inspect the overflow pipe and tubing for clogging
damage and wear. Clean the overflow pipe.
Remove any contaminants that can cause
restriction. Replace the tubing if it is faulty.
8.
Inspect and clean the overflow reservoir, as
needed.
F-95
|