| |
TM 10-3930-664-24
4.
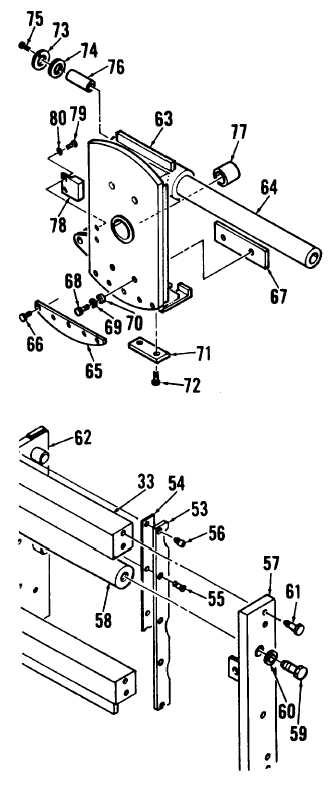
ASSEMBLE SPINE ASSEMBLY (63).
a.
Install manifold (78) onto spine assembly (63)
using screws (79) and washers (80).
b.
Press bushing (77) into spine assembly (63).
c.
Press sleeve bushings (76) into spine tube.
d.
Install seal retainers (73) and seals (74) onto
spine tube using screws (75).
e.
Attach lower wear pad (71) to spine assembly
(63) using screws (72).
f.
Attach rear wear pad (67) to spine assembly (63)
using screws (68) and washers (69, 70).
g.
Attach front wear pad (65) to spine assembly
(63) using screws (66).
h.
Carefully slide spine assembly (63) onto sideshift
bar (64).
5.
INSTALL SPINE ASSEMBLY (63) AND CARRIER
END PLATES (57).
WARNING
Spine
assembly
is
heavy
and
awkward. Enlist the help of an
assistant when installing to prevent
injury to personnel and damage to
components.
a.
Attach lifting sling to spine assembly (63).
Connect to hoist and take up slack.
b.
Position spine assembly (63) onto carrier frame
(33). Install carrier end plates onto carrier frame
using eight screws (61).
c.
Attach carrier end plates (57) to sideshift bar
(58) using screws (59) and washers (60).
6.
INSTALL WEAR PADS (53) AND SHIMS (54)
ONTO CARRIER WELDMENT (62) USING
SCREWS (55) AND SLOTTED STUDS (56).
4-115
|

