| |
TM 10-3930-664-24
WARNING
Rear axle assembly is very heavy and
awkward. Enlist the help of an aide
when removing from chassis to prevent
injury to personnel and damage to
components.
3.
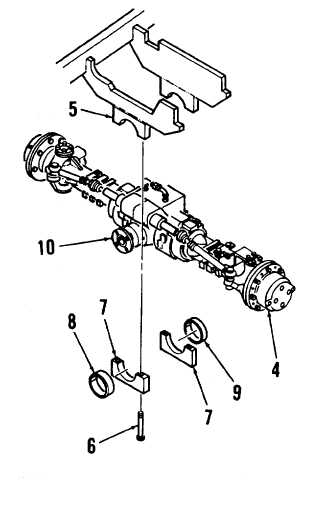
Place floor jack under center of rear axle
assembly (4). Raise floor jack until it meets rear
axle assembly.
4.
Match mark upper trunnions (5) to lower
trunnions (7) to ensure similar installation.
5.
Release rear axle assembly (4) from upper
trunnions (5) by removing screws (6) and lower
trunnions (7).
6.
Lower floor jack until rear axle assembly (4) is
clear of upper trunnions (5). Pull rear axle
assembly (4) out from rear of chassis.
7.
Remove rear axle bushing (9) from rear axle
assembly (4).
8.
Remove axle flange (10) and front axle bushing
(8).
B.
CLEANING
Clean rear axle assembly in accordance with paragraph
1-24.
C.
INSPECTION
1.
Perform overall inspection of rear axle assembly
components in accordance with paragraph 1-24.
2.
Inspect all hydraulic fittings for evidence of
leakage. Tighten fittings as required.
3.
Inspect for evidence of leakage at plugs.
Tighten plugs as required.
4.
Inspect steering case pivot pins for evidence of
leakage. Check for signs of excessive wear and
evidence of rubbing.
5.
Inspect tie rods for obvious damage. Ensure tie
rod ends are securely fastened. Tighten as
required.
3-135
|

