| |
TM 10-3930-664-24
4.
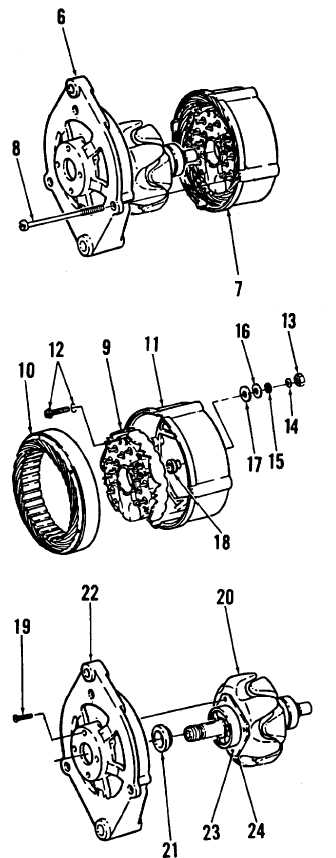
Test for proper operation of rectifier plate (9) prior to
removal. Using multimeter, check resistance
between the following test points:
- Housing and winding ends
- B+ and winding ends
- D+ and winding ends
Resistance between all test points should be less
than 0.33 ohms. Higher reading indicates defective
diode. Replace rectifier plate (9) if diode is defective.
5.
Test for proper stator resistance prior to removal of
stator (10). Resistance between phase outlets shall
be 0.22 ohms + 10%.
6.
Using soldering gun, remove solder from phase
connections on rectifier plate (9). Using a
screwdriver, straighten ends of leads. Pull leads out
of fastening holes.
7.
Carefully pull stator (10) out of ring end shield (11).
8.
Remove two screw and washer sets (12). Remove
nuts (13), washers (14), insulating washers (16),
spring washers (15), insulators (17), and insulator
caps (18) from B+ and D+ terminals.
9.
Carefully remove rectifier plate (9) from ring end
shield (11).
10. Remove four screws (19). Pull assembled rotor (20)
and bearing (21) out of drive end shield (22).
11. Using bearing puller, remove bearings (21, 23) from
rotor (20). Remove cover plate (24).
12. Test rotor (20) for proper resistance. Resistance
shall be 9.0 ohms +10%.
13. Using test prods, apply 80 vac to rotor (20). Check
for short circuit to ground.
3-91
|

