| |
8-5.
FRONT DIFFERENTIAL CARRIER ASSEMBLY - REPLACE/REPAIR/ADJUST (Cont’d)
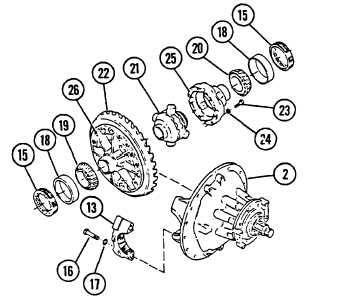
d. Install two bearing cups (18)
over bearing cones (19 and 20) on
case halves (25 and 26).
e. Use a sling and hoist to lift
differential and ring gear
(18-26) as an assembly and
install into differential carrier
(2). Bearing cups (18) must be
flat against bores between
differential carrier (2) legs.
f.
Install both bearing adjusting
rings (15) into position between
differential carrier (2) legs.
Turn each adjusting ring (15)
hand tight against bearing cup
(18).
g. Install bearing caps (13) over
the assembled bearing cups (18)
and bearing cones (19 and 20),
and adjusting rings (15). Use
match marks made during
disassembly to match original
location of bearing caps.
h. Use a plastic or leather mallet
to fit each bearing cap (13)
tightly against the bearing cups
(18), adjusting rings (15) and
differential carrier (2) legs.
If bearing caps (13) do not fit
correctly, check alignment of
match marks between bearing caps
(13) and differential carrier
(2) leg. If necessary, repeat
STEPS f and g.
i.
Install two capscrews (16) and
two flatwashers (17) that hold
bearing caps (13) to differential
carrier (2) legs. Tighten
capscrews (16) by hand four to
six turns, then torque to between
110 and 145 lb. ft.
ADJUSTMENT
1.
ADJUST PRELOAD OF DIFFERENTIAL
BEARINGS (18-20).
8-26
TM10-3930-660-34
|

