| |
TM 10-3930-653-14&P
Prescribed clear-
0.025 to 0.045
ance
(0.0010 to 0.0018)
mm (in)
[20�C (68�F)]
Feeler gauge
pulling force
0.5 to 1.5
kg (lb)
(1.1 to 3.3)
Feeler gauge
thickness
0.04 (0.0016)
mm (in)
(6) Cylinder liner
If cylinder bore exceeds standard size by more than
1.5 mm (0.059 in), apply a cylinder liner. Use a standard
size piston and hone for proper fit.
Measure outside diameter of liner (at top, middle and
bottom) and hone cylinder bore for fit [oversize of 0.005
to 0.085 mm (0.0002 to 0.0033 in)] based upon
maximum measure-ment value. Liners are removed in
direction of cylinder head. When difficult to remove,
remove with a press.
Outer diameter
Inner diameter
Size Mark
mm (in)
mm (in)
40
91.20 to 91.25
(3.5905 to 3.5925)
45
91.70 to 91.75
86.70 to 86.80
(3.6102 to 3.6122)
(3.413 to 3.417)
50
92.20 to 92.25
(3.6299 to 3.6319)
4-2-4-7.
PISTON, PISTON PIN,
AND PISTON RINGS
(1) MEASURING PISTON WEAR
(1) Inspect piston thrust surface for binding, scratches,
or scars, and replace if excessively damaged or faulty.
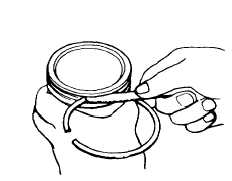
Fig. 4-51. Checking Ring Grooves
(2) Measure
piston
ring
to
piston
groove
(land)
clearance. For this measurement, install a new ring on
piston and measure with a feeler (thickness) gauge. If
clearance exceeds pres-cribed limits, replace rings (or
piston) as required.
Standard mm (in)
Limit mm (in)
Piston
Top
0.040 to 0.073
ring-to-
(0.0016 to 0.0029)
0.1(0.0039)
groove
Second
0.030 to 0.063
(land)
(0.0012 to 0.0025)
0.1 (0.0039)
clear-
Oil
0.03 to 0.08
ance-
(0.0012 to 0.0031)
0.2 (0.0079)
(3) Difference in weight between piston assemblies for
individual cylinders should be within 2 grams (0.0705 oz).
(2) PISTON RINGS
(1) Piston ring end gap
To measure piston ring end gap, apply piston ring to
part of piston skirt where cylinder wear is minimum,
invert piston and, after assuring that piston and ring are
positioned at right angles to cylinder, depress piston.
Measure piston ring end gap with a thickness gauge
and replace piston ring with a new ring if end gap
measurement exceeds I mm (0.0394 in). If end gap is
less than 0.15 mm (0.0059 in), either correct by applying
an oil stone to grind down ends of ring, or replace ring
with a new ring.
(2) Measuring piston ring contracting force.
Measure contracting force with a ring tester. If load
required to contact gap is below specified value, replace
ring.
4 - 32
|

