| |
TM 10-3930-653-14&P
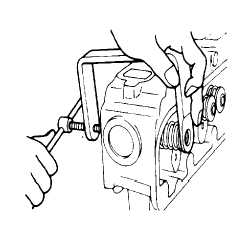
Fig. 4-34. Removing Valve Spring
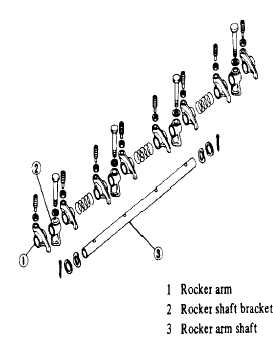
37. Remove bolts from rocker shaft bracket.
38. Remove cotter pin, washer, and outer spring and
then remove rocker arm shaft and bracket in that order.
Fig. 4-35. Disassembling Valve Rocker Parts
39. Remove lock nuts and adjusting nuts from rocker
arm.
WARNING
Exercise care when removing snap
rings, these parts are under spring
tension. Severe injury may result by
the part striking your eye if you don’t
observe this precaution. If your eye
is struck by a foreign object, seek
medical aid immediately.
40. Remove piston rings beginning with top ring (A ring
expander helps but is not mandatory)
41. Extract piston pin.
Piston pin and connecting rod are a press fit. To
remove piston pin, first remove snap rings and heat
piston [80°C (176°F)] and press out pin.
Note: Keep piston, piston pin, piston
rings and connecting rod for each
cylinder together so that they are not
interchanged (mixed) with parts for
other cylinders.
4-2-4.
INSPECTION AND REPAIR
4-2-4-1.
PREPARATIONS FOR
INSPECTION
WARNING
Dry cleaning solvent P-D-680 is toxic
and flammable. Wear protective
goggles and gloves and use only in a
well ventilated area. Avoid contact
with skin, eyes, and clothes and don’t
breathe vapors. Do not use near
open flame or excessive heat. If you
become dizzy while cleaning with
solvent, get fresh air immediately and
get medical aid. If contact with skin
or clothing is made, flush with water.
If contact with eyes is made, wash
your eyes with water and get medical
aid immediately.
WARNING
Compressed air used for cleaning
purposes will not exceed 30 PSI. Use
only with effective chip guarding and
personal
protective
equipment
(goggles/shield, gloves, etc.).
(1) Prior to cleaning, check cylinder head and cylinder
block for water leakage.
(2) Thoroughly clean all compartments and completely
remove all oil, grime, sealing, etc.
(3) Blow compressed air through oil passage in main
gallery, etc. To make sure that passages are not
clogged.
(4) lay out components such as main bearing cap,
connecting rod, etc. as individual assemblies or groups
(for each cylinder) so that they are not interchanged
(mixed).
4-2-4-2.
INTAKE MANIFOLD
WATER JACKET
(1) Check water jacket plate for leakage. If there is
leakage, replace gasket.
(2) Also check water hose for deterioration or damage,
replacing if necessary. If water leaks at or around
connection, retighten clamp.
4 - 27
|


