 |
|||
|
|
|||
|
Page Title:
TOPIC 4. VALVES-INTAKE AND EXHAUST |
|
||
| ||||||||||
|
|
 TM 10-3930-644-14&P
TOPIC 4. VALVES-INTAKE AND EXHAUST
A. GENERAL
C. REMOVING VALVES
Valves require grinding at various intervals during the
The cylinder head as well as the valve tappet cover must
engine service life. These intervals cannot be exactly
be removed to gain access to the valves and valve
specified because many variable factors are involved,
springs. The end of each valve stem is fitted with a
often without the operator's knowledge. Of these factors
shallow steel retainer that surrounds the end of the valve
the following have been found, to a greater or lesser
spring, and is held to the stem by a pair of wedge
degree, to cause reduced valve life:
keepers or retainers. These retainers must be removed
before the valve can be removed.
1. Fuels that break down to farm deposits that
impair seat contact and prevent heat induction.
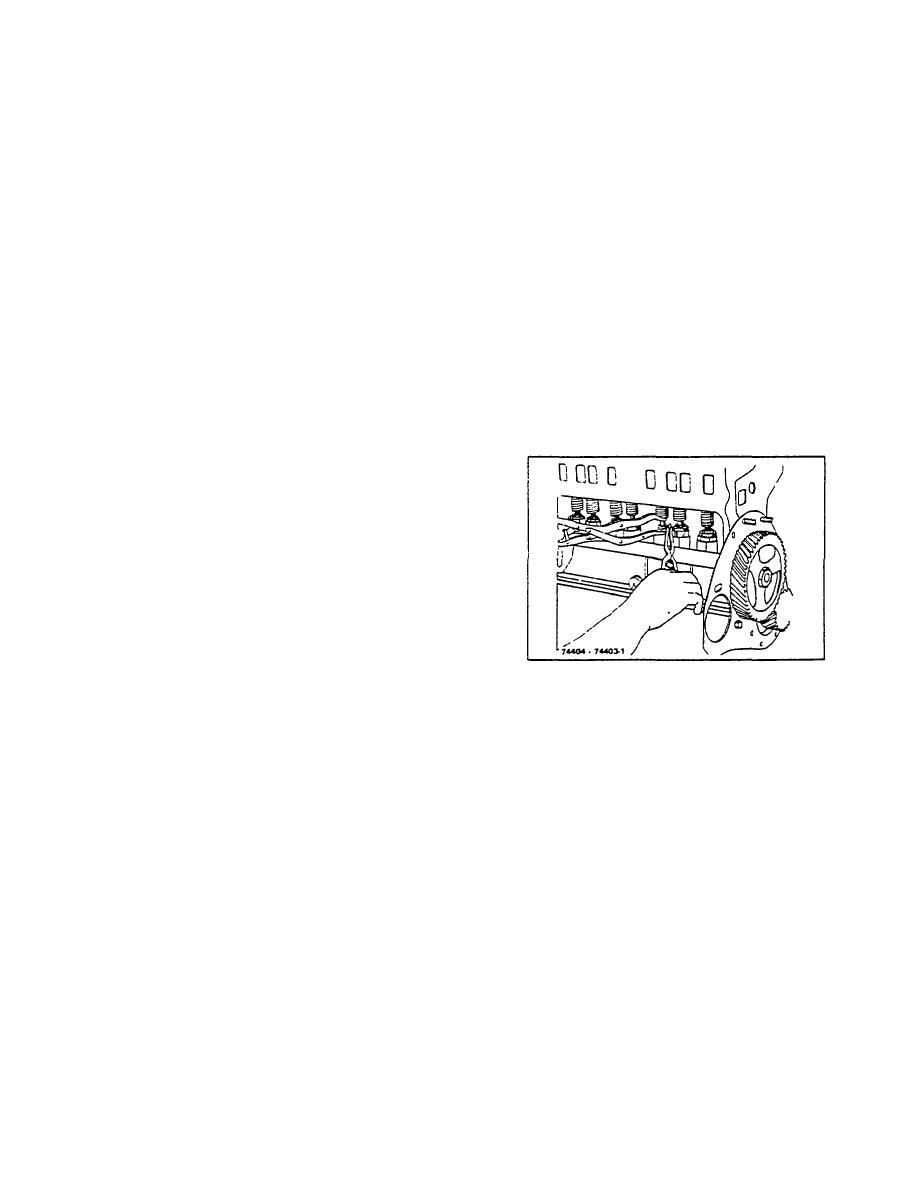
With a valve spring lifter (Figure 4-1) compress the
2. Deposits from either fuels or oils that
springs and remove the locks or pins from the valve
accumulate on the valve stems, and cause
sterns which are in a closed position. Close the other
burning and sticking.
valves by rotating the crankshaft and remove the locks
3. Oil not reaching valve guides due to dirt or
(or pins) from these valves in the same manner.
sludge.
Remove all valves and place them in order, in a rack
4. Shutting down a hot engine without idling for a
with holes. numbered for both intake and exhaust
few minutes. Exhaust valves that happen to be
valves, so they will be reinstalled in their original
off the seat when the engine stops may warp; so
positions.
that, burning occurs on restarting.
5. Tappet clearances not correctly maintained.
6. Lean mixtures due to incorrect carburetor or
incorrect carburetor adjustments.
7. Pre-ignition due to incorrect timing, wrong plugs,
carbon deposits, or excessive operating
temperatures.
B. CHECKING COMPRESSION
A compression check is the best method of determining
whether or not valves need grinding. Since different
pistons will develop different cranking compression
Figure 4-1. Valve Removal
pressures due to compression ratio variations, no
specific figures can be given for this test.
Most
D. SERVICING OF VALVES AND COMPONENTS
significantly, the pressures in all the cylinders must be
within a 10 p.s.i. variance. If it is felt that compression is
Upon removing each valve, examine it carefully.
leaking past the piston rings, inject some heavy engine
Remove all carbon and burned oil, and check the valve
oil through the spark plug hole before making the test.
stem and its fit in the guide. Excessive wear in either the
This will temporarily seal the rings. in addition, a quick
stem or guide will make it impossible to Secure a tight
knowledge of valve condition may be gained by listening
seat by grinding, unless the valve or guide, and possibly
at the carburetor entrance (remove air cleaner
both, are replaced.
Check valves and seats for
connection) and the exhaust outlet while the engine is
excessive burning, cracks or pitting. Check the valve
cranked over. Piston ring blow-by may be heard at the
guides by inserting a valve and noting the amount of
oil filler opening as the pistons are slowly brought into
side play. Worn valve guides should be replaced. Refer
compression and the air allowed to seep past. If valves
to following subparagraph 1, Valve Guides.
are leaking badly, the piston ring leakage may not be
noticeable. Another indication of leaking valves is an
Whenever the valve chamber cover is removed, the
unsteady vacuum reading, particularly at idling speed.
valve and spring mechanism should be examined for
evidence of inadequate lubrication due to sludging.
Excessive sludge in the valve spring area is an
indication of too low oil operating temperature, poor
filtering action, or an oil that breaks down and is unsuited
for the operation involved.
R-104-1
3-7
|
|
Privacy Statement - Press Release - Copyright Information. - Contact Us |
