| |
TM 10-3930-643-34
ELECTRICAL SYSTEM MAINTENANCE.
5-1.
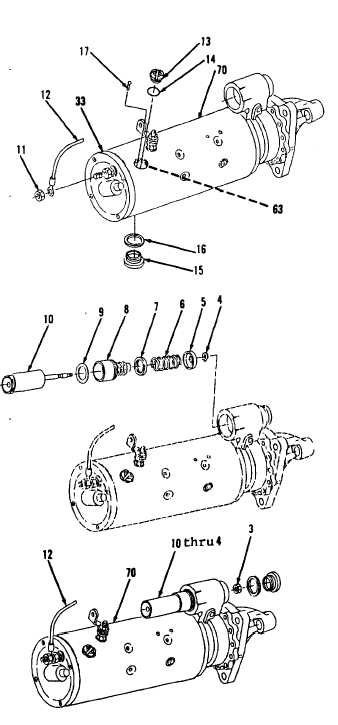
Starting Motor. (Sheet 14 of 15)
ASSEMBLY
83.
84.
85.
86.
87.
88.
89.
90.
91.
92.
Using a flat tip screwdriver, install
two screws (17).
Secure coil (63)
leads to element holder (33).
Access
through ports of plugs (13 and 15).
Install new gasket (16), plug
(15),
new gasket (14) and plug (13).
Using a 3/4” open end wrench, install
lead assembly (12) and nut (11).
Install washer (9),
bellows (8),
recessed washer (7),
spring (6),
recessed washer (5) and retaining
ring (4) in plunger (10).
Compress
spring (6) to install retaining ring
(4) on groove of plunger (10) shaft.
Install items 10 thru 4 as
assembly in starting motor
(70).
Using a 1/2” open end wrench, install
new locknut (3).
Do not tighten.
NOTE
Following this assembly procedure
for starting motor,
install
solenoid on
starting
motor
housing, refer to TM 10-3930-
643-20.
Disconnect lead assembly (12) from
solenoid mounted on starting
motor
housing (70).
Position starting motor and solenoid
assembly in soft-jawed vise.
Connect starting motor to 24 volt
battery as shown, using two jumper
leads.
Do not
connect
battery
negative to MTR terminal at
this
time.
Connect jumper lead A to battery
negative or terminal G, as shown.
Go to sheet 15
5-15
|