 |
|||
|
|
|||
|
|
|||
| ||||||||||
|
|
 Caution: Lift armature straight up carefully to
avoid damage to commutator or core.
(6) Remove screws (19) and lock washers
(20) securing rear end plate (21) to stator (41).
Attach chain to rear end plate and, with chain hoist.
lift armature. bearings, retainer and end plate_ lip and
out of stator. (fig. 3-87.)
(7) Remove shaft key and remove end plate.
(8) Bend the tabs of the bearing lock washer
123. fig. 3-86) down then, using a spanner wrench,
remove the lock nut (22).
(9) Using a gear puller with a shaft protector,
remove the retainer (29) from the armature shaft.
The seal and bearing will come off with the retainer.
(10) Remove the bearing from the retainer.
Note Bearing is of the single shield type and can
be regreased. All old grease should be removed from the
bearing and the bearing thoroughly, washed out. Check
the bearing for running smoothness and replace if any
roughness is in evidence. Repack bearing only half full
with grease. Grease the bearing according to LO 10-
3930-620-12.
Caution: Overgreasing
bearing
will
cause
overheating, so care must be taken to make certain
grease cavity is packed only half full.
When
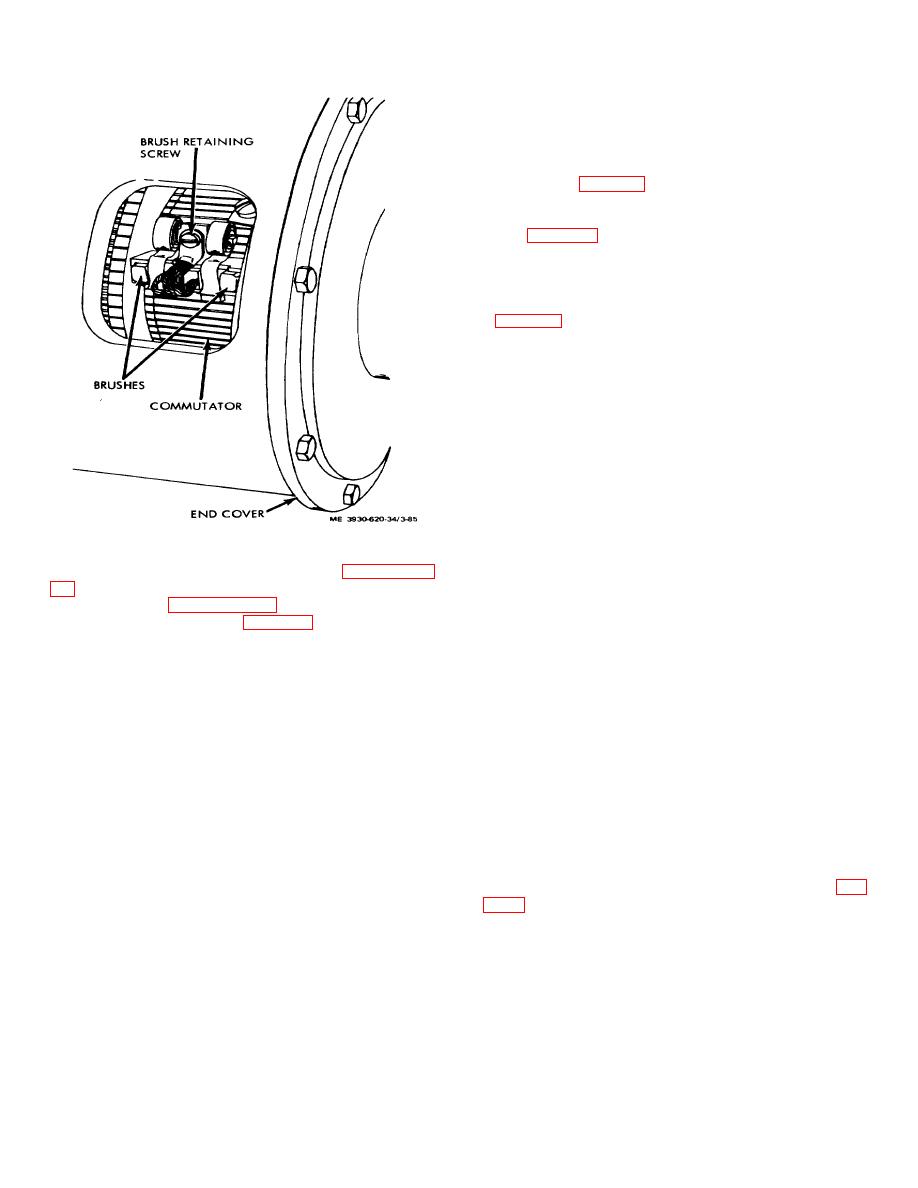
Figure 3-85. Brush location.
reassembling make certain shield faces outward. (11)
c. Removal. To remove the drive motor without
Remove and inspect retainer preformed packing.
removing the drive axle assembly, refer to paragraph 2-
Replace seal if worn or damaged. Seal is a light press
fit.
as a unit, refer to paragraph 2-23.
Note. Bearing retainer with seal must be
d. Motor Disassembly. (fig. 3-86.)
installed on shaft before installing bearing.
(1) Place the drive motor in a clean working
(12) Remove and replace commutator end
area.
bearing if worn or damaged as it is a sealed type and
(2) Remove seat brake lock nut, drum, hub,
cannot be lubricated.
brake assembly, and woodruff key from shaft.
(13) Remove fan by applying a steady
(3) Remove rear cover (1) from around stator
amount of pressure against the back side of the fan.
(3), remove brush retaining screws (9), lift brush
The fan is hand pressed on against a key, angled up on
retaining springs (81 and withdraw brushes (10) from
the backside to prevent fan from being pressed on too
brush holders (14).
far and causing possible damage to armature windings.
(4) Place motor on end with drive end up.
(14) Remove end cover capscrews and
Caution: Use extreme care whenever using a gear
remove end cover and rocker arm assembly.
puller or center of shaft will be damaged. An
improper
(15) Field coils should not be removed unless
puller will flare out shaft center, damaging threads to the
replacement is required. To remove, loosen slotted
extent of requiring a new armature shaft. Use a shaft
screws securing pole shoes to stator, remove shims
protector in conjunction with the gear puller.
behind pole shoes, noting quantity and location of the
(5) Remove cotter key, nuts, pinion
shims and remove screws, pole shoes, and coils. (fig.
gear, and key from armature shaft. Use a gear puller to
remove the pinion gear.
Caution: Handle field coils carefully to avoid
damaging insulation.
e. Specifications.
H.P...................................................................... 8.33
RPM.................................................................... 1080
Volts.................................................................... 36
Amps .................................................................. 200
Duty .................................................................... 1hr
Service Factor .................................................... 1.0
3-96
|
|
Privacy Statement - Press Release - Copyright Information. - Contact Us |
