 |
|||
|
|
|||
|
Page Title:
REAR DIFFERENTIAL CARRIER ASSEMBLY REPLACEMENT/REPAIR/ ADJUSTMENT - continued |
|
||
| ||||||||||
|
|
 TM 10-3930-673-34
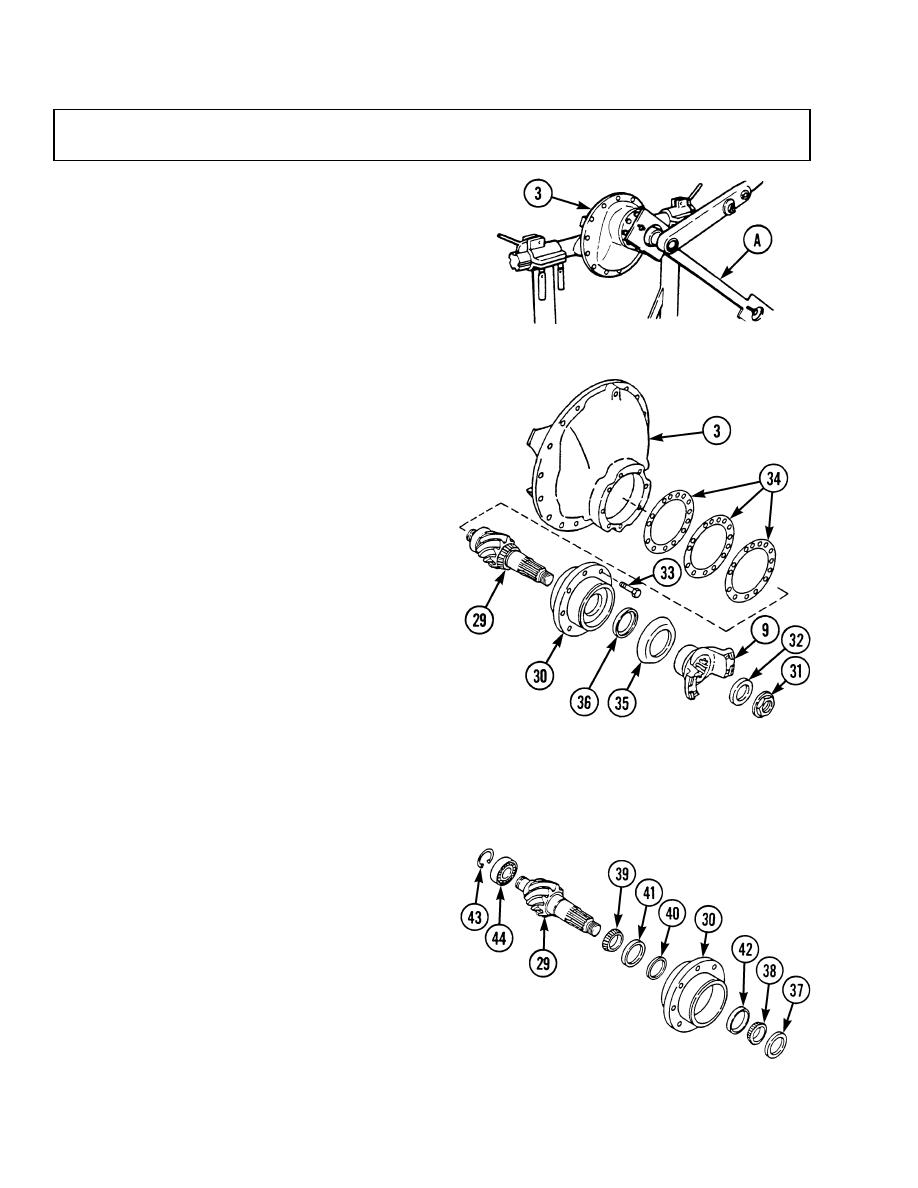
9-5. REAR DIFFERENTIAL CARRIER ASSEMBLY REPLACEMENT/REPAIR/
ADJUSTMENT (CONT)
(4)
Remove bevel pinion (29) and
bearing cage (30) from differential
carrier (3).
(a)
Place differential carrier (3) on
bench and clamp carrier securely.
(b)
Fasten fabricated yoke nut tool to
companion yoke. Hold fabricated
yoke nut tool (A) to remove bevel
pinion nut (31) and washer (32).
(c)
Remove companion yoke (9) with
deflector (35). Use a puller if
necessary.
(d)
Remove eight screws (33) from
bearing cage (30).
(e)
Remove bevel pinion (29), bearing
cage (30), and shims (34), as an
assembly, from the differential
carrier (3). Keep shims together for
ease of assembly. If shims are
damaged, measure total thickness of
shim pack and record dimension;
discard shims. Shim thickness
dimension will be needed to
calculate depth of bevel pinion in
differential carrier when gear set is
installed.
TR00435
(5)
Disassemble bevel pinion (29) and
bearing cage (30).
(a)
Use suitable puller to remove pinion oil seal (36) from bearing cage (30).
(b)
Remove pinion bearing cage thrust
washer (37).
(c)
Place bevel pinion (29) and bearing
cage (30) in a press with splined end
of pinion at the top of assembly.
(d)
Support bearing cage (30) under
flange area with blocks.
(e)
Use a press to remove bevel
pinion (29) from bearing cage (30)
9-14
|
|
Privacy Statement - Press Release - Copyright Information. - Contact Us |
