| |
TM 10-3930-671-24
CAUTION
When Installing camshaft, use special
care to prevent camshaft bumping
and loosening expansion plug at rear
of crankcase causing an oil leak.
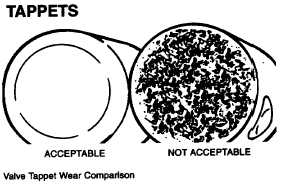
1.
Inspect each tappet carefully. Two or three
small pits on the contact face is acceptable;
more than that calls for replacement of the
tappet. A damaged tappet could mean possible
damage to the camshaft.
2.
Check the outside diameter with a micrometer to
determine if replacement is necessary because
of wear. Refer to limits and clearance section.
REAR CRANKSHAFT OIL SEALS
The overhead valve engines have the rear crankshaft oil
seals incorporated in the combination rear main bearing
cap and filler block.
The rear crankshaft oil seal has a stiffener ring imbedded
in the rubber and no metal retainer is required.
The overhead valve engines have a good, trouble-free
rear crankshaft oil seal if carefully installed.
IMPORTANT: Installing rear oil seals correctly
demands careful workmanship. Install seal with lip
pointing toward engine.
Worn oil seals should be replaced in the following
manner:
1.
Remove rear bearing cap and filler block
assembly by using a puller.
Remove old seals and thoroughly clean all contact
surfaces.
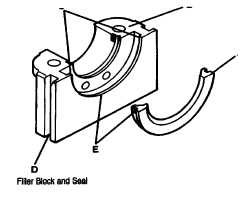
2.
Install crankshaft oil seals "A" on engine block
and main bearing cap.
Before installing break edge ’C" slightly on both cap and
block to avoid cutting the seals during installation and
coat seal edge ’E", contacting the groove with sealing
compound.
NOTE
This oil seal can be Installed without
removing the crankshaft in this case,
use only light grease in the seal
groove to assist sliding the seal in
place. Apply pressure to the seal so
that it will hug the crankshaft which
will also help moving it In place.
F-181
|