| |
TM 10-3930-671-24
system ineffective to properly maintain normal operating
temperatures. The appearance of rust in the radiator or
coolant is a warning that the corrosive inhibitor has host
its effectiveness and should be cleaned before adding
fresh coolant.
Dependable cleaning compounds should be used.
Follow the procedure recommended by the supplier.
This is of prime importance because different cleaners
vary in concentration and chemical compositions. After
cleaning and flushing, the system should be filled with an
approved anti-freeze compound containing a rust and
corrosion inhibitor.
REVERSE FLOW FLUSHING
Whenever a cooling system is badly rustclogged as
indicated by overflow loss or abnormally high operating
temperatures, corrective
cleaning
by
reverse
flow
flushing will most effectively remove the heavy deposits
of sludge, rust and scale. The reverse flow flushing
should be performed immediately after draining the
cleaning solution. It is advisable to flush the radiator first,
allowing the engine to cool as much as possible.
Reverse flush the radiator, as follows:
1.
Discontent the hoses at the engine.
2.
Put radiator cap on tight.
3.
Clamp the flushing gun in the lower hose with a
hose clamp.
4.
Turn on the water and let it fill the radiator.
5.
Apply air pressure gradually, to avoid radiator
damage.
6.
Shut off the air, again fill the radiator with water
and apply air pressure. Repeat until the flushing
stream runs out clear.
7.
Clean and inspect radiator cap.
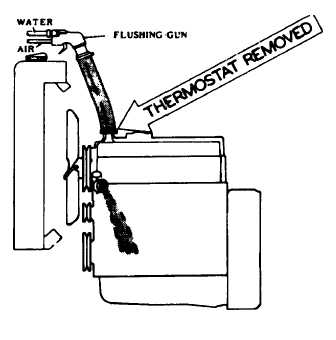
To reverse, flush the engine water jacket:
1.
Remove the thermostat.
2.
Clamp the flushing gun in the upper hose.
3.
Partly close the water pump opening to fill the
engine jacket with water before applying the air.
4.
Follow the same procedure outlined above for
the radiator by alternately filling the water jacket
with water and blowing it out with air 5.5 Bar (80
PSI) until the flushing stream is clear.
TESTING THERMOSTAT
Remove the water outlet elbow. Before testing, clean
and examine the thermostat. If the valve can be pulled
or pushed off its seat with only a slight effort when cold
or it does not seat properly, the unit is defective and
should be replaced.
Thermostat operation can be checked In the following
method:
1.
Hang thermostat by its frame in a container of
water so that it does not touch the bottom.
2.
Heat the water slowly and check temperature
with a thermometer.
3.
If
the
valve
does
not
start
to
open
at
temperatures of 180 - 200"F 81- 930C or it
opens well before the 180°F (81 C) point Is
reached, the thermostat should be replaced.
F-147
|