| |
TM 10-3930-664-24
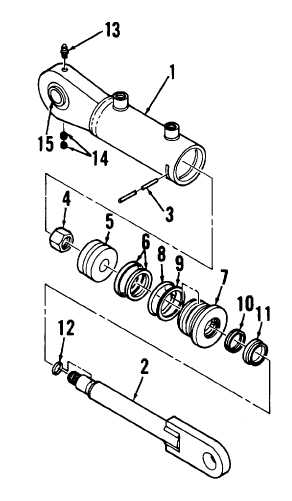
3-69. ROTATE CYLINDER REPAIR
This task covers: Disassembly, Cleaning, Inspection, Repair, and Assembly
INITIAL SETUP:
Tools and Test Equipment:
Equipment Condition:
General Mechanics Tool Kit (1, App. E)
Rotate cylinder removed
Torque Wrench (32, App. E)
(para. 2-161)
Spanner Wrench (31, App. E)
Materials / Parts:
Lubricating Fluid (16, App. C)
Grease (10, App. C)
Emery Cloth (7, App. C)
Seal Kit, P/N 6965-34 (1 ea.)
A. DISASSEMBLY
1.
Place cylinder clevis in a vice with clevis
perpendicular to vise jaws. Support cylinder
barrel (1). Pull rod assembly (2) out of barrel
until completely extended.
2.
Using a screwdriver, pry up lockwire (3) to
enable removal from freelift cylinder. Using a
spanner
wrench,
unscrew
gland
(7)
until
,lockwire is completely removed.
CAUTION
Use
care
when
extracting
and
handling rod assembly components
to prevent damage.
3.
Remove rod assembly (2) from barrel (1) and
place clevis end of rod assembly in a vise with
soft metal jaws. Support rod assembly.
4.
Remove nut (4) from rod assembly (2). Remove
piston (5) and gland (7).
5.
Remove and discard piston seal (6), O-ring (8),
backup ring (9), seal (10), wiper (11), and O-ring
(12).
6.
Remove grease fitting (13) and setscrews (14).
Remove bearing (15).
3-230
|