| |
TM 10-3930-664-24
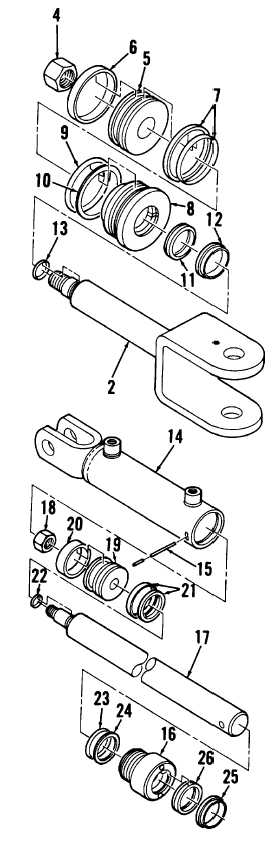
4.
Remove nut (4) from rod assembly (2). Remove
piston (5) and gland (8).
5.
Remove and discard wear ring (6), piston seal
(7), O-ring (9), backup ring (10), seal (11), wiper
(12), and O-ring (13).
B. DISASSEMBLY OF MAIN LIFT CYLINDER
1.
Place cylinder clevis in a vice with clevis
perpendicular to vise jaws. Support cylinder
barrel (14). Pull rod assembly (17) out of barrel
until completely extended.
2.
Using a screwdriver, pry up lockwire (15) to
enable removal from freelift cylinder. Using a
spanner wrench, unscrew gland (16) until
lockwire is completely removed.
CAUTION
Use
care
when
extracting
and
handling rod assembly components
to prevent damage.
3.
Place pin through hole in rod assembly (17) and
against vise to keep rod assembly from turning.
Remove rod assembly from barrel (14) and
place in a v: se with soft metal holders.
4.
Remove nut (18) from rod assembly (17).
Remove piston (19) and gland (16).
5.
Remove and discard wear ring (20), piston seal
(21), and O-ring (22).
6.
Remove and discard O-ring (23), backup ring
(24), wiper (25), and seal (26).
C. CLEANING
Clean lift cylinder components in accordance with
paragraph 1-24.
D. INSPECTION
1.
Conduct
overall
inspection
of
lift
cylinder
components in accordance with paragraph 1-24.
2.
Inspect used piston seals for signs of scoring. If
seals are scored, examine barrel for damage. If
barrel is scored it must be replaced.
3-225
|