| |
TM 10-3930-664-24
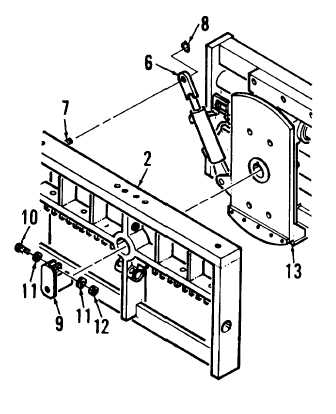
3.
Release rotate cylinder (6) from stub shaft (7) on
rotate carriage by removing retainer (8).
WARNING
Carriage assembly
is
heavy
and
awkward. Enlist the help of an aide
when removing to prevent injury to
personnel
and
damage
to
components.
4.
Attach lifting sling to carriage weldment (2).
Attach hoist to secure carriage weldment
during removal.
5.
Release rotate carriage pin (9) from carriage
weldment (2) by removing screw (10), washers
(11), and nut (12). Discard nut (12).
6.
Remove rotate carriage pin (9) from carriage
weldment (2). Separate carriage weldment from
sideshift carrier (13).
B. CLEANING
Clean carriage assembly in accordance with paragraph
1-24.
C. INSPECTION
Inspect carriage assembly and related components in
accordance with paragraph 1-24.
D. INSTALLATION
WARNING
Carriage assembly
is
heavy
and
awkward. Enlist the help of an aide
when installing to prevent injury to
personnel
and
damage
to
components.
1.
Using hoist, mate carriage weldment (2) to
sideshift carrier (13). Install rotate carriage pin
(9) using a soft head hammer.
2.
Secure rotate carriage pin (9) to carriage
weldment (2) using screw (10), washers (11),
and new nut (12).
3.
Secure rotate cylinder (6) to stub shaft (7) using
retainer (8).
3-215
|