| |
TM 10-3930-664-24
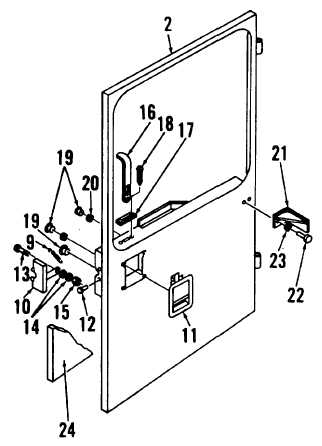
2.
REMOVE LATCH CAM (10), LATCH (11), AND
LATCH RELEASE (16).
a.
Disconnect spring (9) from latch cam (10) and
latch (11) by removing bolt (12).
b.
Remove shoulder bolt (13), washers (14), and
nut (15) to release latch cam (10) from latch
release (16).
c.
Remove door bezel (17) from door (2) by
removing screws (18). Remove latch release
(16).
d.
Remove latch cam (10) from door (2) by
removing remaining bolts (12).
e.
Remove plugs (19). Remove latch (11) from
door (2) by removing nuts (20).
3.
REMOVE
DOOR
HOLD
BRACKET
(21)
BY
REMOVING BOLTS (22) AND WASHERS (23).
4.
REMOVE INSULATION (24) FROM DOOR (2)
ONLY IF REPLACEMENT IS REQUIRED.
B.
CI.EANING
Clean door assembly components in accordance with
paragraph 1-24.
C.
INSPECTION
1.
Conduct
overall
inspection
of
door
assembly
components in accordance with paragraph 1-24.
2.
Inspect window for cracks or holes. Check for
chipped edges.
3.
Inspect window rubber for cracking, deformation, or
permanent set.
4.
Work latch to ensure smooth operation.
D.
REPAIR
1.
Repair of the door assembly consists of removal and
replacement of defective, deformed, or damaged
components.
2.
Repair door sheet metal in accordance with TC 9-
510.
3-184
|