| |
TM 10-3930-664-24
D.
INSTALLATION
WARNING
Front axle assembly is very heavy and
awkward. Enlist the help of an aide
when installing onto chassis to prevent
injury to personnel and damage to
components.
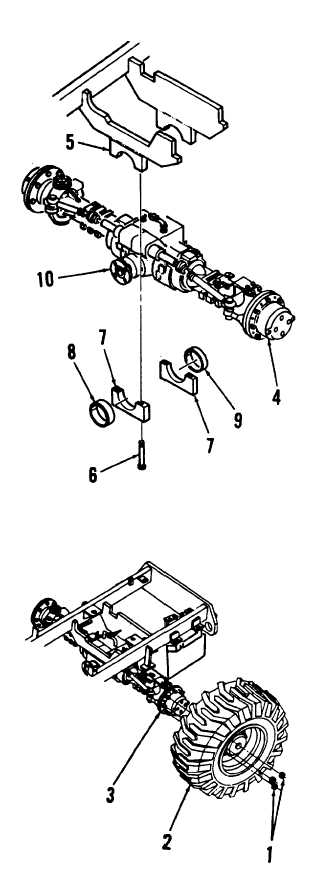
1.
Install rear axle bushing (9) onto rear axle
assembly (4).
2.
Install axle flange (10) and front axle bushing (8).
Torque to 190 to 220 in-lbs (22 to 25 Nm).
3.
Place rear axle assembly (4) under chassis and
center on top of floor jack.
4.
Connect right hand steering hose to rear axle
assembly fitting.
NOTE
Using
match
marks,
mate
lower
trunnions to original upper trunnions.
5.
Raise floor jack until rear axle assembly (4)
mates with upper trunnions (5). Secure rear axle
assembly using lower trunnions (7) and screws
(6). Torque screws (6) to 260 ft-lbs.
6.
Connect brake lines to rear axle in accordance
with paragraph 2-112, Step 5.
7.
Install wheels (2) onto planet gear carriers (3).
Install lug nuts (1) and tighten.
8.
Raise unit and remove jack stands. Lower unit.
Torque lug nuts (1) in a criss-cross pattern to
300 ft-lbs (407 Nm).
FOLLOW-ON MAINTENANCE:
Install counterweight (para. 2-124)
Install rear drive shaft (para. 2-99)
Connect steering lines (para. 2-119)
Bleed rear brakes (para. 2-104)
END OF TASK
3-136
|