| |
TM10-3930-660-34
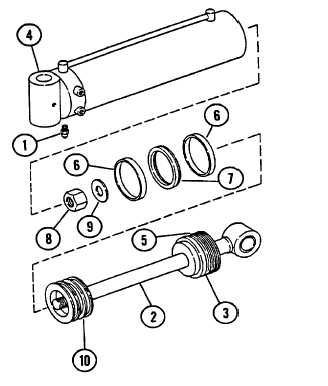
16-10. CARRIAGE TILT CYLINDER - REPAIR (Cont’d)
ASSEMBLY
NOTE
Wipe all sealing surfaces on cylinder
clean and dry. Apply film of clean
hydraulic oil to all seals as they are
installed.
1.
ASSEMBLE CYLINDER PARTS (1-16).
a.
Install bushing (16).
b.
Install seal (14) and rod wiper (15) inside gland
(3).Ensure that seal (14) lip is positioned the
same way as it was before disassembly.
c.
Install back-up ring (13) and new O-ring (5) on
outside diameter of gland (3).
d.
Slide gland (3) and washer (12) onto rod (2).
e.
Lubricate piston (10) inner diameter with clean
hydraulic oil. Install new O-ring (11) inside bore
of piston (10).
f.
Use cleaning solvent and lint free rag to clean
threads on rod (2) and new nut (8).
g.
Slide piston (10) onto rod (2).
h. Apply Loctite 1271 on threads of rod (2) and nut
(8).Install nut (8) and washer (9) on rod (2).
i. Place rod (2) and piston assembly on suitable
supports to prevent damage during assembly.
j. Install two wear rings (6) and one new seal (7) on
piston (10). Position wear rings so that gaps are
180 degrees apart.
CAUTION
Use care when installing rod (2) and
piston assembly. Keep rod (2) in line
with cylinder tube (4) to prevent binding.
Failure to follow this precaution will
cause part damage.
k.
Lubricate cylinder tube (4) inner diameter, piston
(10) outside diameter and gland (3) outside
diameter with clean hydraulic oil.
1.
Position rod (2) and piston assembly in cylinder tube
(4).
NOTE
Tighten gland (3) so that it is flush with
end
of
cylinder
tube
(4).Do
not
overtighten gland.
m. Tighten gland (3) onto cylinder tube (4).
n.
Install counterbalance valve (1) in cylinder tube
(4) as noted during disassembly.
2.
INSTALL CARRIAGE TILT CYLINDER, TM10-3930-
660-20.
16-44
|