| |
TM10-3930-660-34
16-5. MLRS ATTACHMENT CONTROL VALVE - REPAIR (Cont’d)
j.
If removal of plugs (37 and 38) was necessary,
install them.
k.
Use match lines on housing sections (39, 40 and
41), inlet housing (31) and outlet housing (36) and
assemble them in proper order on tie rod (34) and
two tie rods (35). Install nuts (32 and 33).
l.
Torque four nuts (33) to 14 ft. lbs. Torque two nuts
(32) to 33 ft. lbs.
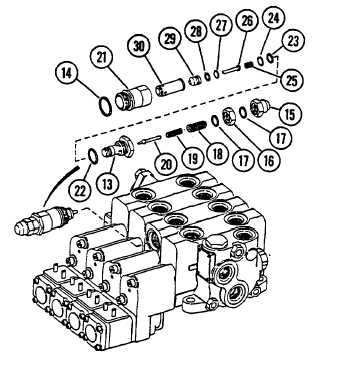
2.
IF REMOVAL WAS NECESSARY, ASSEMBLE
AND INSTALL RELIEF VALVE PARTS (13-30).
a.
Install new O-ring (27) on poppet (29).Install
back-up ring (28).
b.
Install poppet (30), poppet (29), piston (26),
and spring (25) into body (21).
c. Install new O-rings (22 and 24) onto plug (13).
d.
Install back-up ring (23) onto plug (13). Install
plug assembly (13)
into body (21).
e.
Install poppet (20), spring (19) and adjusting
screw (18).
f.
Install one new O-ring (17) into each nut (15
and 16).
g.
Install nuts (15 and 16).
h.
Install
relief
valve
parts
(13-30)
as
an
assembly. Torque relief valve to between 30
and 50 ft. lbs. at plug (13).
16-28
|