| |
TM10-3930-660-34
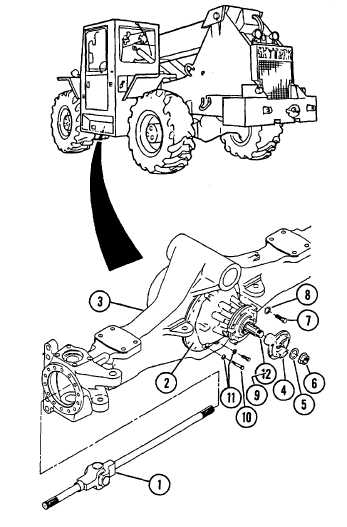
8-5.
FRONT DIFFERENTIAL CARRIER ASSEMBLY - REPLACE/REPAIR/ADJUST (Cont’d)
a. Carefully tip axle assembly so
that front differential carrier
(2) faces up.
b. Re-install companion flange (4),
washer (5) and nut (6) that
were removed with park brake
assembly. The drive yoke will
provide a lifting point for
differential carrier (2) during
removal.
NOTE
Capscrews from differential carrier (2)
to axle housing (3) are of three
different sizes. Note size, location
and quantity of capscrews when removing
for correct location during replacement.
c. Remove twelve capscrews (7),
twelve flatwashers (8), two
capscrews (9), two capscrews
(10) and four flatwashers (11)
from differential carrier (2).
d. Use a leather or rubber mallet to
loosen differential carrier (2) in
axle housing.
e. Use a sling placed around bevel
pinion, behind companion flange
(4), to lift and support the
differential carrier (2) during
removal.
f.
Carefully remove differential
carrier (2) from axle housing (3).
g. Place differential carrier (2) on
stand or bench, with ring gear up,
and clamp securely.
h. Remove companion flange (4), nut
(6) and washer (5) from bevel
pinion (12).
8-11
|