| |
TM 10-3930-660-34
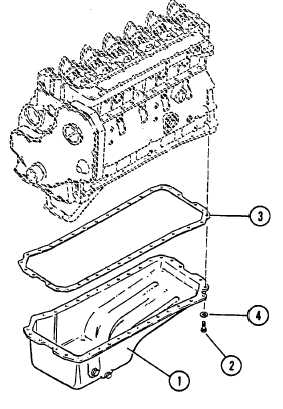
3-20. OIL PAN - REPLACE
This task covers:
a.
Removal
b.
Cleaning
c.
Inspection
d.
Installation
Initial Setup
Tools
Materials/Parts
Tool Kit, Automotive Mechanics
Container, 5 gallon
Gasket (3)
Shop Equipment, Automotive
K&W Copper Coat Sealant (App. B, Item 14)
Maintenance and Repair, Common
Lint-Free Rags (App. B, Item 38)
#1 Less Power
Equipment Condition
Engine oil drained,
L010-3930-660-12.
Negative battery cable disconnected,
TM 10-3930-660-20.
REMOVAL
1.
PLACE A SUITABLE CONTAINER UNDER OIL
PAN (1).
2.
REMOVE THIRTY-SIX CAPSCREWS (2) AND
SPECIAL WASHERS (4).
3.
REMOVE OIL PAN (1) AND GASKET
(3).DISCARD GASKET (3).
CLEANING
See Cleaning Instructions, para. 2-10.
INSPECTION
See Inspection Instructions, para. 2-11.
INSTALLATION
1.
COAT BOTH SIDES OF NEW GASKET (3) WITH
SEALANT.
NOTE
Install special washers (4) with concave side
towards oil pan.
2.
INSTALL NEW GASKET (3) AND OIL PAN (1)
AND RETAIN WITH THIRTY-SIX SPECIAL
WASHERS (4) AND CAPSCREWS (2).
3.
TIGHTEN CAPSCREWS (2) TO 216 IN. LB.
4.
FILL ENGINE WITH OIL, LO10-3930-66-12.
3-123
|

