| |
TM 10-3930-660-34
3-10.2 CRANKSHAFT REAR SEAL - REPLACE (Cont’d)
INSTALLATION
CAUTION
The
seal
lip
and
sealing
surface
on
crankshaft must be clean to help prevent an
oil leak around the seal.
1.
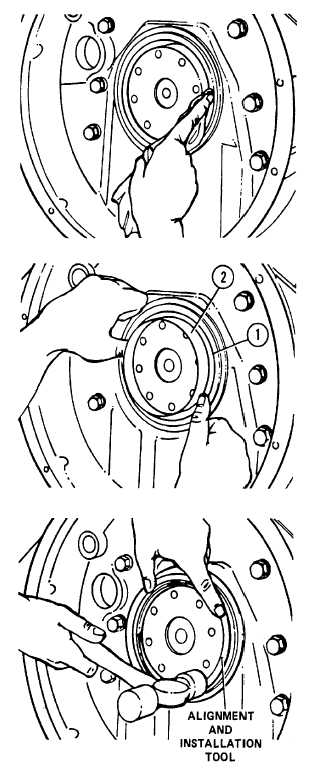
CLEAN SEAL LIP AND SEALING SURFACE
ON CRANKSHAFT WITH CLEAN WIPING
RAGS.
2.
INSTALL SEAL PILOT (2) SUPPLIED WITH
SEAL KIT ONTO CRANKSHAFT.
CAUTION
Always use the seal pilot (2) to install rear oil
seal (1). Failure to do so could result in a
damaged oil seal (1).
3.
INSTALL OIL SEAL (1) OVER SEAL PILOT (2)
AND ONTO CRANKSHAFT.
4.
REMOVE SEAL PILOT (2) FROM CRANK-
SHAFT.
CAUTION
Tap alignment/installation tool at the 12, 3, 6,
and 9 o’clock positions only. Striking the tool
at other locations could damage the seal
carrier.
5.
USE ALIGNMENT/INSTALLATION TOOL
SUPPLIED WITH SEAL KIT TO MOVE OIL
SEAL (1) TO CORRECT DEPTH IN THE
HOUSING.
a.
Place alignment/installation tool supplied
with rear seal kit onto crankshaft and
against seal carrier with the flange of the
tool away from the seal.
b.
Use a hammer to tap seal into seal retainer
until flange of tool is against seal retainer.
6.
INSTALL FLYWHEEL, PARA. 3-12.
3-83
|