| |
TM10-3930-660-20
18-19.
MLRS ATTACHMENT -
REPLACE (Cont’d)
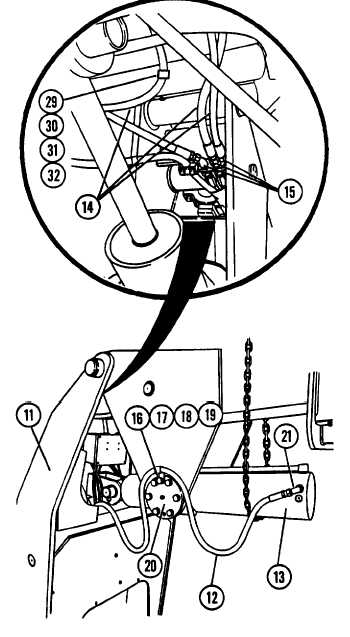
3. CONNECT TWO HYDRAULIC HOSES (12) AT
MLRS ATTACHMENT HOIST CYLINDER (13)
AND THREE HYDRAULIC HOSES (14) AT
BOOM FITTINGS (15).
a.
b.
c.
Uncap boom fittings (15) and
connect three hydraulic hoses (14)
at front of boom as tagged.
Connect two hoses (12) to two
elbows (21) on cylinder (13) as
tagged.
Apply loctite 242 to bolts (16).
4.
5.
Secure each hose (12) to each
endplate (20) with new lockwasher
(19), clamp (18), new lockwasher
(17), and bolt (16).
REMOVE LIFTING DEVICE FROM
ATTACHMENT (10)
INSTALL BOOM ELECTRICAL CABLE (3) AND
CONNECT ELECTRICAL LEADS (1) AT
ELECTRICAL JUNCTION BOX (2).
a. Loosen four screws (4) and
separate cover (5) from box (2).
b. Carefully position cable (3)
through hole in box (2).
Connect electrical leads (1) to
autoleveler circuit board (9) as
described in step 5C through 5e.
Failure to follow instructions in these
steps
board
c.
d.
may result in damage to circuit
(9).
Connect electrical lead 50 to
terminal VS of autoleveler circuit
board (9). Tighten screw on strip
(8) to secure lead 50.
Connect electrical lead 65 to
terminal A of autoleveler circuit
board (9). Tighten screw on strip
(8) to secure lead 65.
e. Connect electrical lead 64 to
terminal B of autoleveler circuit
board (9).
Tighten screw on strip
(8) to secure lead 64.
18-79
|