| |
TM10-3930-660-20
17-6.
MIRROR - REPLACE (Cont’d)
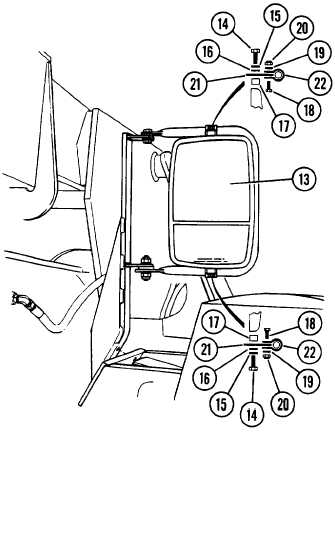
REM0VAL OF MIRROR FACE
Support mirror face (13) so it does not
drop during step 1.
1. Remove two capscrews (14), two
lockwashers (15), two flatwashers
(16), and two spacers (17). Discard
lockwashers (15).
2. If necessary, remove two capscrews
(18), two flatwashers (19), two
locknuts (20), two slotted brackets
(21), and two clamps (22). Discard
locknuts (20).
INSTALLATION OF MIRROR FACE
1. IF REMOVED, INSTALL TWO CLAMPS (22),
TWO SLOTTED BRACKETS (21), TWO NEW
LOCKNUTS (20),
Two CAPSCREWS
Check that mirror
TWO FLATWASHERS (19) AND
(18) .
NOTE
face (13) is properly
positioned before tightening capscrews
(14) in step 2.
2. SECURE MIRROR FACE (13) WITH TWO
SPACERS (17), TWO FLATWASHERS (16),
TWO NEW LOCKWASHERS (15), AND TWO
CAPSCREWS (14).
17-18
|