| |
TM10-3930-660-20
9-11.
TRANSMISSION CONTROL VALVE LINKAGE - REPLACE (Cont’d)
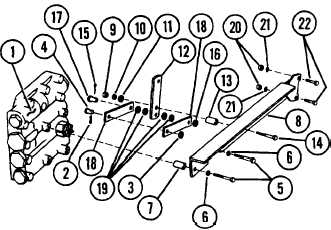
Separate two links (18), four
flatwashers (19), and rocker arm
(12) .
Remove two nuts (20), two
lockwashers (21), and two bolts
(22). Discard lockwashers (21).
INSTALLATION
1.
2.
3.
4.
IF REMOVED, INSTALL PARTS (15) THROUGH
(22) TO EACH ROCKER ARM (12).
a. Install two bolts (22), two new
lockwashers (21), and two nuts (20).
b. Secure two links (18), four
flatwashers (19), and rocker arm
(12) with pin (17), flatwasher
(16), and new cotter pin (15).
IF REMOVED, SECURE PARTS (9) THROUGH
(14) TO BRACKET (8).
a.
b.
Position bolt (14), spacer (13),
and rocker arm (12) on bracket (8).
Secure with flatwasher (11), new
lockwasher (10), and nut (9).
INSTALL PARTS (2) THROUGH (22) TO
TRANSMISSION CONTROL VALVE (1).
a.
b.
c.
d.
Position upper control valve
linkage parts (2) through (22) on
transmission control valve (l).
Secure each bracket (8) with four
spacers (7), four new lockwashers
(6), and four bolts (5).
Install pin (4), flatwasher (3),
and new cotter pin (2).
Report steps 3a through 3C for
lower control valve linkage.
INSTALL TRANSMISSION CABLE ASSEMBLIES
TO TRANSMISSION CONTROL VALVE, PARA.
9-4.
UPPER CONTROL VALVE LINKAGE SHOWN -
LOWER CONTROL VALVE LINKAGE SIMILAR.
9-25/(9-26 Blank)
|