| |
TM 10-3930-659-34
5-14. AXLE HOUSING AND PLANETARY CARRIER ASSEMBLY REPAIR (Con’t).
10.
Install sleeve (18) in axle housing (2).
11.
If removed, install two pins (10) on axle housing (2).
12.
Install axle shaft (15) in axle housing (2).
13.
Position axle housing (2) in vertical position.
14.
Heat bearing cone (22) to a maximum of 3000F (149°C) in accordance with TM 9-214.
15. Press bearing cone (22) on axle shaft (15).
16. Install washer (7) on bearing cone (22).
17. Install planetary carrier (5) on axle shaft (15).
NOTE
As torque is being applied, stop after every 100 lb.-ft. (136 N.m) and turn axle approximately three
revolutions to ensure that bearing cups and cones are properly seated.
18. Install screw (8) on planetary carrier (5). Torque screw in increments of 100 lb.-ft. (136 Norm) until final torque of
607 lb.-ft. (823 Norm) is reached.
19. Loosen screw (8) completely. Tap axle flange with hammer to ensure that there is no preload on bearings.
NOTE
Rolling drag torque must be measured with axle housing In vertical position.
20. Measure and note rolling drag torque of axle shaft (15) with screw (8) loosened (see TM 9-214). Rolling drag
torque should not exceed 16 lb.-ft. (22 Nom).
21. Remove screw (8) and planetary carrier (5).
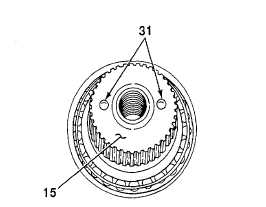
22. Place two 0.3-0.4 in. (7.6-10.2 mm) pieces of lead (31) on end of axle shaft (15) 1800 apart. Use grease to hold
lead in place.
5-139
|