| |
TM 10-3930-659-20
6-41.
HORN SWITCH REPLACEMENT (Con't).
3.
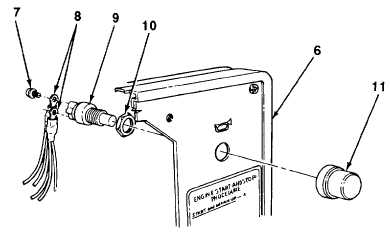
Remove two screws (7) and fault monitor and dash wiring harness terminal leads (8) from horn switch (9).
4.
Remove cover (11) and horn switch (9) from dash plate (6).
NOTE
Note position of nut to aid during Installation.
5.
Remove nut (10) from horn switch (9).
b.
INSTALLATION
1.
Install nut (10) on horn switch (9).
2.
Install horn switch (9) on dash plate (6) with cover (11).
3.
Install two fault monitor and dash wiring harness terminal leads (8) on horn switch (9) with two screws (7).
4.
Install fault monitor console (5) on dash plate (6) with four screws (4) and nuts (3).
CAUTION
Use care not to overtighten screws when Installing dash plate. Dash plate is
plastic and may be damaged if screws are overtightened.
5.
Install dash plate (6) on dash housing (1) with four screws (2).
TA707828
6-147
|