 |
|||
|
|
|||
|
|
|||
| ||||||||||
|
|
 b . End Caps - Remove the snap ring
5-165 INSPECTION AND MAINTENANCE
(Item 1 in Fig. 6-10) which secures
t h e spool and cap and remove the cap
Periodic inspection of spool opera-
t i o n ,o i l c o n d i t i o n a n d p r e s s u r e
(Item 2 in Fig. 6-10)
c o n n e c t i o n s saves time consuming
C. O p e r a t i n g S p o o l - S l i d e t h e
b r e a k d o w n s and unnecessary parts
spool (Item 5 in Fig. 6-10) out of
replacement.
its bore from the cap end and remove
a . All hydraulic connections
the "o"-rings (Item 6 in Fig 6-10)
must be tight. Loose connections
from the valve body around the spool
b a s e . DO NOT remove the centering
not only allow leakage but also
permit air to be drawn into the
s p r i n g assembly (Item 4 in Fig. 6-10)
unless it is necessary to replace
s y s t e m resulting in noisy and
erratic operation.
it.
d . C h e c k Valve - Remove the check
b . Spool should return to
plug (Item 7 in Fig 6-10)
n e u t r a l automatically when control
valve
Remove the "o"-ring (Item 8 in Fig.
is released. If more force is
Remove the spring (Item 9 in
6-10).
necessary, the spool may be bind-
Fig. 6-10) and poppet (Item 10 in
i n g or control linkage may be
Fig. 6-10) from the valve body.
faulty.
C. S y s t e m f i l t e r s a n d r e s e r v o i r
e. Relief Valve - Remove the relief
valve plug (Item 11 in Fig. 6-10).
should be checked periodically for
If excessive
Remove the "o'-ring (Item 12 in Fig.
foreign particles.
R e m o v e the spring (Item 13
c o n t a m i n a t i o n is found, the system
6-10).
should be drained. The reservoir
in Fig. 6-10) and relief valve (Item
must be cleaned thoroughly before
14 in Fig. 6-10) from the valve body.
refilling.
f . V a l v e Body - R e m o v e all the
plugs and "0 "-ring from the blocked
5-166 OVERHAUL
ports on the valve body.
During disassembly, give particular
5-168 CLEANING, INSPECTION AND REPAIR
attention to identification and
orientation of parts for reassembly.
a . D i s c a r d a l l o l d s e a l s . Wash
Spools are selectively fitted to
all parts in a clean mineral oil
valve bodies from which they were
solvent and place them on a clean
removed.
surface for inspection.
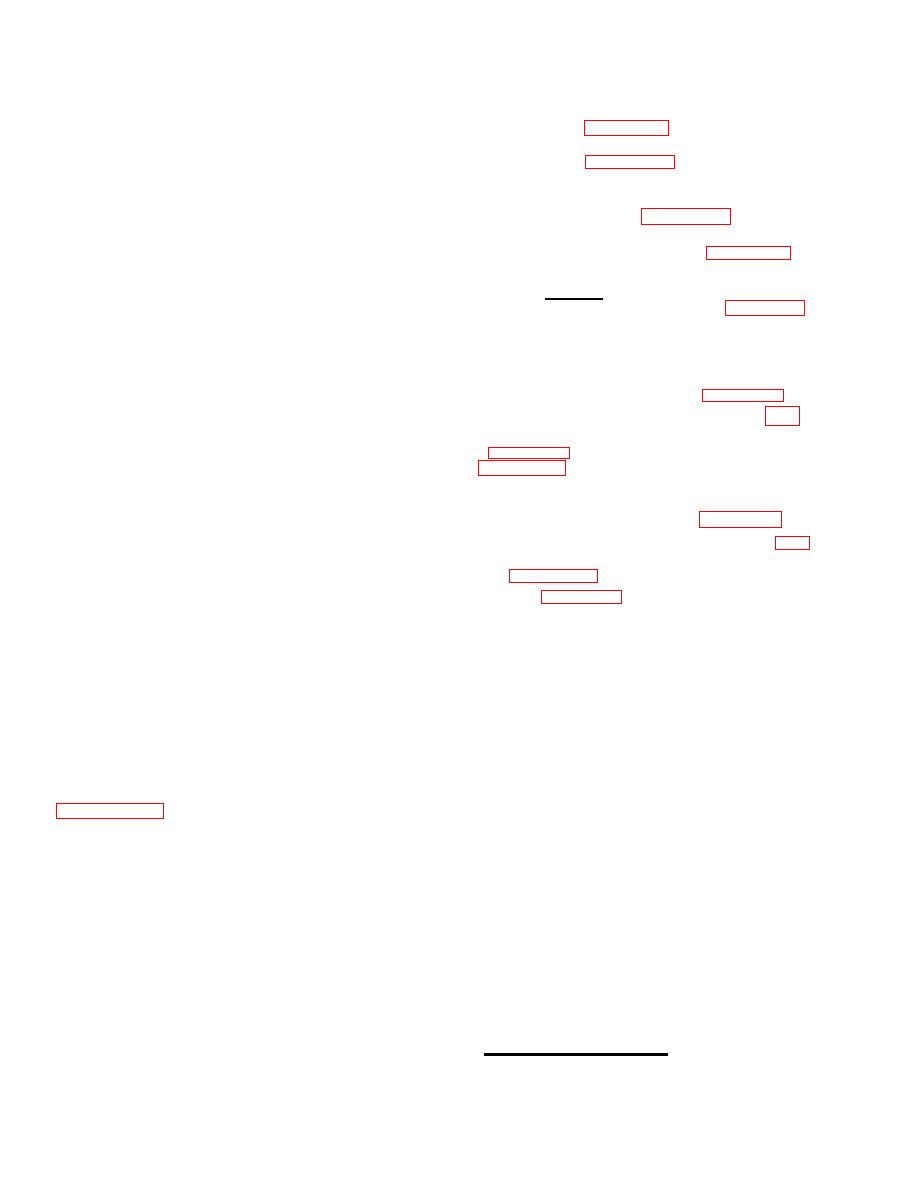
Figure 6-10 is an exploded view
b . C a r e f u l l y remove burrs by
showing the proper relationship for
light stoning or lapping. Be certain
reassembly. R e f e r t o t h i s f i g u r e
t h e r e is no paint or burrs on matting
in the procedures which follow.
s u r f a c e s o f v a l v e b o d i e s . C h e c k all
parts for wear. Replace if necessary.
5-167 DISSASSEMBLY
Inspect the valve spool and
a . C o n t r o l s - Be sure the unit
C.
bores for burrs and scoring. If
is not subjected to pressure. Dis-
scoring is not deep enough to cause
connect and cap all lines to the
objectionable leakage, the surfaces
Aux Valve and disconnect linkage to
can be stoned or polished with crocus
t h e s p o o l . R e m o v e Auxiliary Valve
If scoring is excessive, the
from machine.
cloth.
valve body and spool must be replaced.
Check the valve spool for freedom of
m o v e m e n t in the base.
5-202
|
|
Privacy Statement - Press Release - Copyright Information. - Contact Us |
