| |
NON-ELECTRICAL GAGES MAINTENANCE.
15-2.
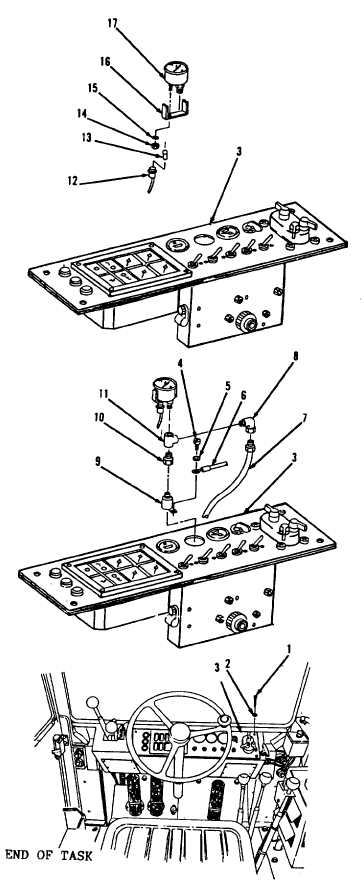
Air Pressure Gage. (Sheet 3 of 3)
CLEANING/INSPECTION
14.
Clean all parts with mild detergent
and water solution. Wripe dry with
clean cloth. Refer to paragraph
2-8.
15.
I n s p e c t a l l p a r t s . R e f e r t o p a r a-
graph 2-9.
INSTALLATION
16.
Install gage (17) on instrument
panel (3).
17.
Install bracket (16).
18.
U s i n g a 3 / 8 ” s o c k e t a n d s o c k et
wrench handle, install two
l o ck
washers (15) and nuts (14).
19.
Install lamp (13).
20.
Connect wire assembly (12).
21.
Using 3/4” and 9/16” open end
w r e n c h e s , i n s t a l l t e e ( 1 1 a n d
reducer (10).
22.
Using a 7/16” open end wrench,
install connector (9).
23.
Install elbow (8).
24.
Connect hose assembly (7).
25.
Connect wire assembly (6).
26.
Using a flat blade screwdriver,
install lock washer (5) and screw
( 4 ) .
27.
Position instrument panel (3) in
h o u s i n g i n f r o n t o f o p e r a t o r ’s
compartment.
28.
U s i n g a c r o s s t i p s c r e w d r i v er
install four washers (2) and screws
( 1 ) .
NOTE
Return M10A Forklift to original
equipment condition.
TM 10-3930-643-20
15-7
|