| |
TM 10-3930-643-20
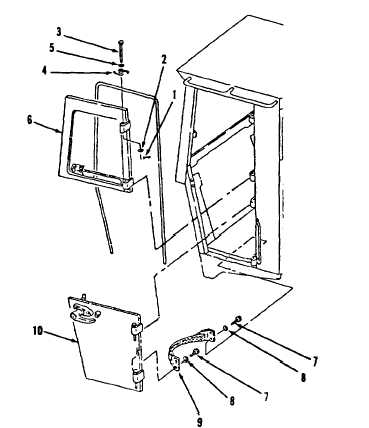
BODY, CAB, HOOD AND HULL MAINTENANCE
12-10.
Door (S/N 2001 and above).
(Sheet 1 of 5)
This task covers:
a.
Removal
b. Disassembly
c .
Cleaning/Inspection
d. Assembly
e.
I n s t a l l a t i on
INITIAL SETUP
Tools
Materials/Parts
Tool Kit, General Mechanic’s
Cleaning solvent P-D-680
Automotive
(App. C, Item 2)
NSN 5180-00-177-7033
Clean cloth (App. C, Item 10)
Detergent (App. C, Item 16)
Bulk seal - 11-1/2’ long, 24” long
Sound suppression
Cotter pin
Torques
Except for special torques shown,
all fasteners are tightened to a
standard torque.
Refer to
Appendix E.
REMOVAL
NOTE
Be sure door is closed when
performing steps 1 and 2.
1.
2.
3.
Using long round nose pliers,
remove cotter pin (1) and washer
(2) from bottom of pin (3) at
upper hinge.
Discard cotter pin
( 1 ).
Push up and remove pin (3) with
spring (4) and washer (5).
Remove spring (4) and washer (5)
from pin (3).
Upper half of door is now on
one hinge pin only.
4.
Open door and release latch
connecting upper half of door
(6) with lower half of door (10).
Go to sheet 2
12-47
|