| |
BODY, CAB, HOOD AND HULL MAINTENANCE.
12-6.
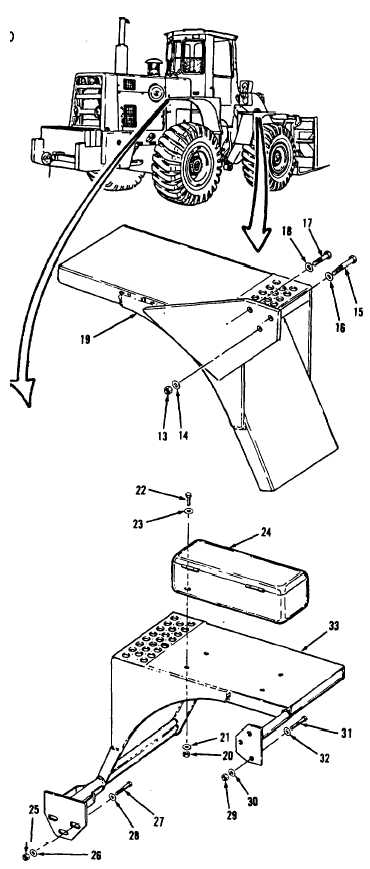
Fenders and Tool Box. (Sheet 3 of 6)
REMOVAL
6.
7.
8.
9.
10.
11.
12.
13.
14.
15.
A t t a c h h o i s t a n d s l i n g t o r i g h t
front fender (19).
Using a 3/4” socket, socket wrench
handle and a 3/4” box and open end
wrench, remove nut (13), washer (14),
bolts (15) and washer (16) from right
front fender (19).
Remove two bolts (17) and washers
( 1 8 ).
Using hoist and sling, remove right
front fender (19) and place securely
on wood blocks on floor.
Remove
bolts (22), washers (23) from tool-
box (24) on right rear fender (33)
of vehicles S/N 2001 and above.
Remove tool box (24).
NOTE
Steps 12 thru 15 is the mainte-
nance procedure for removal of
the right rear
f e n d e r . T h e
maintenance procedure for removal
o f t h e l e f t
r e a r f e n d e r i s
TM 10-3930-643-20
hoist and sling.
Using a 9/16” socket, socket wrench
handle and a 9/16” open end wrench,
remove four nuts (20), washers (21).
i d e n t i c a l .
Attach hoist
fender (33).
Using a 3/4”
handle and a
remove three
and sling to right rear
socket, socket
wrench
3/4” box end wrench,
n u t s ( 2 5 ) , w a s h e r s
(26), bolts (27) and washers (28)
from right rear fender (33).
Remove three nuts (29), washers
(30), bolts (31) and washers (32).
Using hoist and sling, remove right
rear fender (33) and place securely
on wood blocks on floor.
Remove
hoist and sling.
Go to sheet 4
12-29
|